
User guide
How to use your association website
Choose who you are. Each part has short steps and a picture of what you will see.
New here? Getting startedDownload this guide (PDF)Setup checklistGetting-ready packet (PDF)
Getting started with Association Lobby
Association Lobby by Claw Media LLC gives each condominium, HOA or co-op its own private website, for owners, residents, the board, property managers and maintenance staff.
1. Choose the right way to sign in
Unit owners and residents: go to your association's website and press Unit owner sign-in. Type your unit number and the email the association has on file. You don't need a password.
Board members, property managers and maintenance staff: press Staff sign-in at the top of the association's website, or Board on associationlobby.com, and use the email the association added for you. If you never set a password, press Forgot password, or never set one?, or use Email me a link.
Admin on associationlobby.com is only for Association Lobby's own team. It's not the association board.
New here? Getting started, at associationlobby.com/guide/getting-started, walks owners, board members and property managers through their first steps and everything they can do.
Or let the concierge show you: after you sign in, press the concierge with the yellow flag, Show me around, at the bottom left of the page. He walks you through each part of your own page, one step at a time, with Back and Next buttons. Owners, board members, property managers and maintenance staff each get their own tour.
2. Find your associations on the Dashboard
After Staff sign-in on associationlobby.com, press Dashboard. It lists each association you've been added to, with what needs attention, such as open maintenance and requests waiting for a decision. Press an association to open its website.
A property manager sees only the associations they've been added to. Another association's information never shows.
3. Get around any association website
The menu at the top has the community pages. Everyday pages are along the top, and the rest are in groups under More. Press your name for My household, My dashboard and Your access. The board and staff also have Board tools, set out in groups such as Today, Answer requests and Calendars. On a phone, press Menu, then a heading to open its group. The bell shows what's new for you.
Press Accessibility at the top to make the text larger, add more contrast or turn off motion. Each part of this guide has short steps for what you do.
4. Getting a new association ready
An association that's about to join gathers its owner list, governing documents and a few decisions, and sends them to the property manager. The getting-ready packet lists everything, with boxes to tick and fill in.
For unit owners and residents
Everything you need to take part, in a few simple steps.
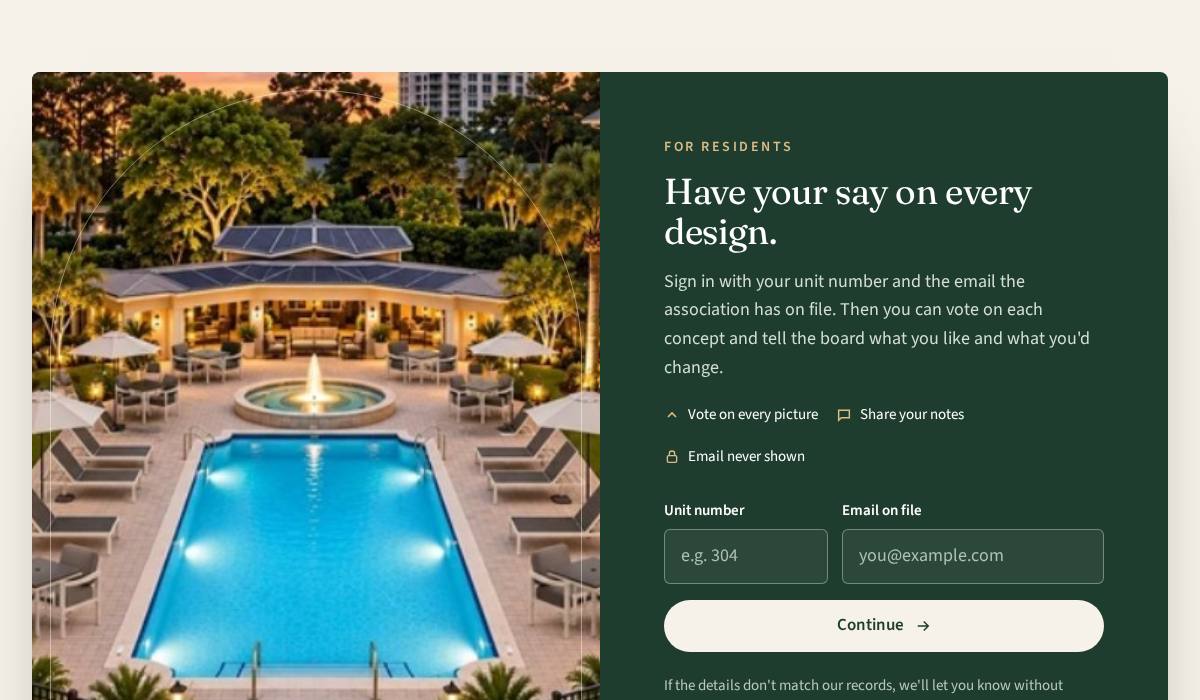
1. Sign in with your unit number and email
Go to your association's website and press Unit owner sign-in under the big photo. The sign-in box opens. Type your unit number and the email the association has on file.
Press Continue. If the details don't match the list, the site tells you. Ask your board to check your unit and email.
You stay signed in on that phone or computer for 7 days after your last visit, and for 30 days at most. Some associations also email you a 6-digit code the first time you sign in on a new phone or computer. Type the code on the screen to finish.
If you rent and the board listed you under the owner's unit, sign in with that unit number and your own email.
After you sign in, you land on My page, your own page for your home. Use the menu to go anywhere else.
The association's home page changes once you sign in. Visitors see About the building: facts, amenities, what's nearby and common questions for people thinking of buying or renting. Signed-in owners and residents see What's happening instead: a welcome banner, then votes open for you, projects coming up, the latest newsletter and new items from neighbors.
A small blue number next to Marketplace, Homes for sale or Documents in the top menu shows how many were added since you last opened that page. Open the page and the number goes away. It's kept on each phone or computer, so a new device starts with the last week. The red number next to Messages is unread messages.
2. Find your way with the menu
The menu at the top takes you to Home, Messages, Marketplace, Homes for sale, Documents, Report a problem and your Household.
Press Accessibility at the top to make the text larger, add more contrast, or turn off motion.
Documents opens with folders, such as Rules or Insurance. Press a folder to see its files and any folders inside it, or type a word, such as pets, in Search documents. Search looks inside each document and shows the page where the word appears.

3. Look, vote and tell the board why
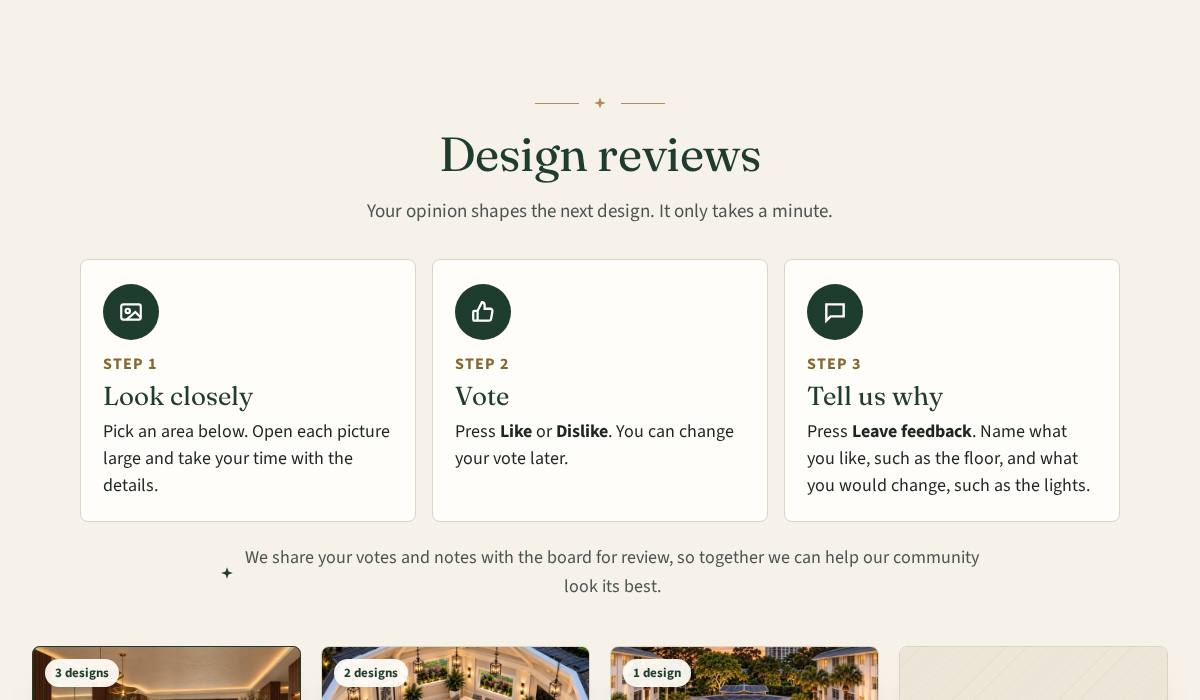
Design reviews has its own page now. Open the menu, then More, then Design, and press Design reviews. The home page also has a See the design ideas button.
Pick an area, such as the lobby or the pool.
Look closely at each picture, press Like or Dislike, and write a short note. Sign in first; voting and notes are for signed-in owners.
Each owner has one vote on each picture. Pressing Like or Dislike again changes your vote; it never adds a second one. If two owners share a unit, each has their own vote.
We share your votes and notes with the board for review. Tenants can look at the photos and notes. Voting is for owners on the unit list.
Not sure how? Press the concierge with the yellow flag and choose Show me around. The tour opens Design reviews and points to Like, Dislike and Leave feedback.
Building colors: at the top of Design reviews, above the areas, is a section with two big tabs. See neighbors' designs (the yellow number shows how many) lists every design an owner locked in, most votes first. Each card shows today's building next to the new colors, the wall, trim and shutter colors, and the number of votes. Press Vote for this design to vote; your choice then says Your vote with a check mark. You have one vote, and voting for a different design moves it. Press Compare to open one design with today and the new colors side by side, its color swatches, Vote for this design, Save picture and colors, Print picture and colors, and Back to all designs. Press Compare full screen to see the difference big: Both pictures shows today above the new colors, and Flip shows one large picture with a yellow button that switches between today's colors and the new colors in the same spot. The large white Close button at the top right (or the Escape key) takes you back. Names and units are never shown, and the board sees totals, not who chose what.
Make your own: tap one of the eight presets (such as Coastal Linen, Modern Sandstone or Atlantic Elegance) to fill in the description, or type the look you'd like in plain words, then choose how the light should look: Keep the photo's light (the normal choice, best for picking colors, because only the paint changes) or Bright sunny day (looks nicer, but the light is changed; these designs are marked Bright sunny day look). Press Paint my design. Every owner's design is painted by the same AI (ChatGPT unless the paint testers switch it), so there is no engine to choose. The AI picks a wall color, a trim and band color, and a shutter and railing color (if you don't name one, the shutters and railings match the trim). Please be patient: it takes about a minute, so don't press the button again or leave the page while it says Painting. Each owner can make up to 10 designs a day (the board can set a lower number), counting every building photo together. A large box next to Paint my design shows how many are left today. After painting, today's building and your design appear side by side (stacked on a phone) with the swatches, which AI painted it, its tokens and about what it cost. Only you can see it until you press Lock it in and share; then everyone sees it under See neighbors' designs, and it counts as your vote. Press Back to today's photo to show just today's building and try another look. You can delete your own designs that you haven't locked in: press Delete, then Yes, delete it. To delete several at once, check the box on each one (or press Check all), press Delete checked designs, then say yes. A deleted design still counts toward the 10 a day. Once locked in, a design stays shared and can't be deleted. Print picture and colors makes a one-page sheet with the picture, large color samples, color names, hex and RGB values to take to a meeting or a paint store. Save picture and colors saves one full-size picture with the color samples under it, so you can keep it, text it or print it later. Painting a design takes about a minute; please stay on the page.
For the board: the paint designer is a switch on the features page (off until the association turns it on). Settings, then Helpers and AI, then Paint designer is where the president, a site admin or the owner adds building photos (JPEG, PNG or WebP up to 25 MB, kept at full size; owners design on the newest one), sets how many designs each owner can make per day (1 to 10), and sees the credit balance and the credits used for designs in the last 30 days. Each design uses 25 prepaid credits ($0.25), taken before painting starts and returned automatically if painting fails. When the balance runs out, owners see a note to ask the board, and no emails are sent. Credit packs are bought on the Credits and automatic refills page.
Make it your own: under each building photo on the Paint designer page, the board can change the title owners see (instead of Building colors), the words under it, and the Design page category the photo belongs to, then press Save words. Leave the title or words empty to use the standard ones. To use a different picture, add a new photo; owners design on the newest one.
Put the best designs on the Design page: on the Paint designer page, Put designs on the Design page lists the designs owners locked in, with the most votes first. Check one or more, pick a category (it starts on the photo's category) and press Put on the Design page. Each design is copied there as a regular picture with its colors and vote count written under it, so owners can vote and comment on it like any other design. Only locked-in designs can be put there. Under On the Design page now, press Take off the Design page to remove one; the owner's paint design stays in the paint designer.
Credits and automatic refills: open Settings, then Helpers and AI, then Credits and automatic refills (board members can also use the link on the board page). It shows the balance (one credit is one cent). Under Buy a credit pack, the president, a board admin or the property manager can pay once by card through Stripe: $10 for 1,000 credits, $25 for 2,600 or $50 for 5,250; the credits are added after the payment goes through. The president, a board admin or the property manager can set a refill rule in dollars, for example when the balance drops to $5, refill it to $25, and save a card with Stripe (Association Lobby never sees the card number). Refills also need a monthly cap: refills never go over it in a calendar month and start again on the 1st. Setting or changing the cap needs two approvals, and one must be the president: one board member proposes the cap (their proposal counts as their approval), and the president or another board member presses Approve this cap. Credits are added only after Stripe confirms the payment. If a card is declined, the page says so and refills wait until the card is replaced. No emails are sent.
When neighbors share designs, My page shows a box such as "10 neighbors shared paint ideas for the building" with See the designs and Make my own buttons, and More, then Design reviews in the menu shows a number for designs shared since you last opened that page on this device. No emails are sent. The Show me around tour walks through the tabs, voting, the full-screen compare and making your own.
4. Report a problem
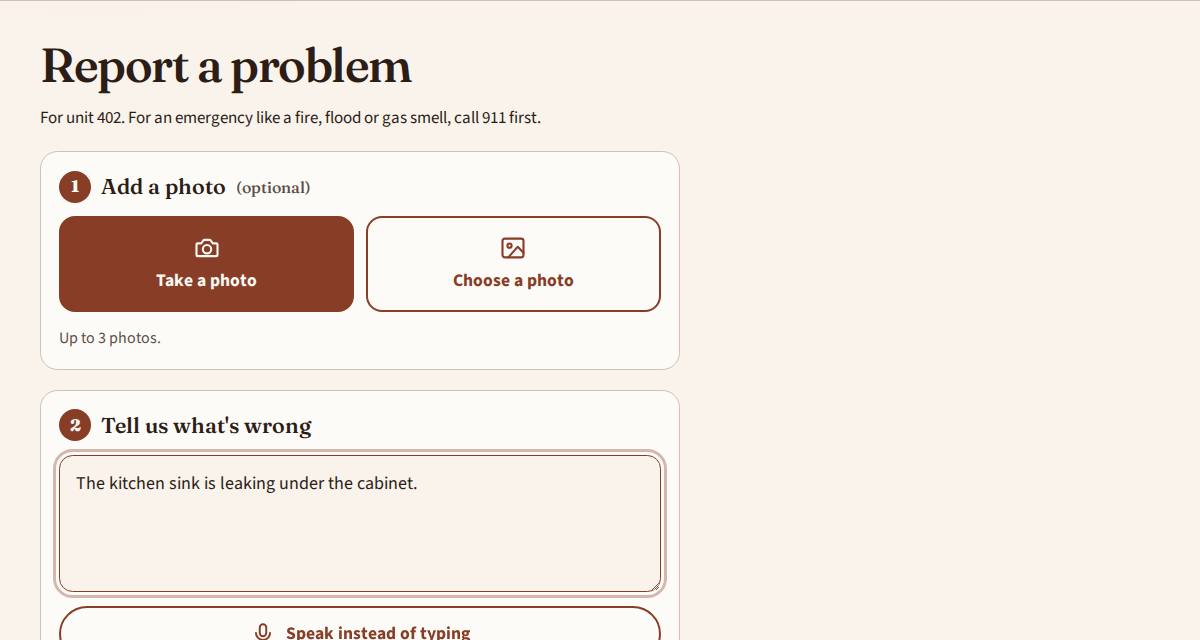
On a phone, press the Report a problem button at the bottom of the screen. On a computer, it is in the menu.
Press Take a photo to use your camera. Then type what's wrong, or press Speak instead of typing and say it. Choose where it is and press Send to maintenance.
It goes straight to the maintenance queue. You can follow it on the same page.
Before you write, look at Already reported in shared areas at the top of the page. It lists problems in the hallways, lobby, pool, garage and other shared spaces that are open or were fixed in the last 30 days, with their status. Unit numbers are never shown. If your problem is there, the board and maintenance already know.
While you type, Is it one of these? shows reports that look like yours. If it's the same problem, you don't need to send it again.
When a request is done, it says Marked done by, with the person's name and role, and the date and time. What was done shows below it. You also get an email that says who marked it done.
5. Send messages
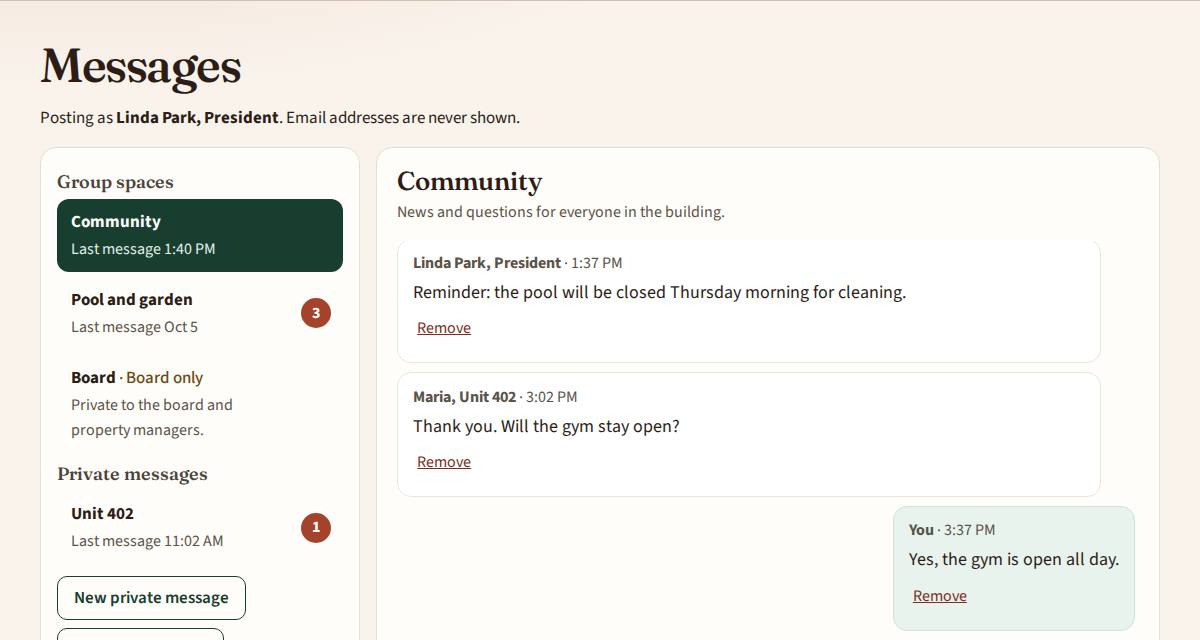
Messages has group spaces, such as Community, and private messages. Press New private message and choose who to write to: the board, the property manager, or another household. Private messages are read only by the people they're sent to, and Association Lobby staff don't read them.
A message to the property manager is read only by the property manager. A message to the board is read by the board and the property managers.
If the board shares the budget, Budget shows in your menu. Press Ask about this under a line and type your question. It goes to the board and the property manager, and their answer shows in Messages.
Your email address is never shown to others. People see your name and unit.
A red number next to Messages in the menu shows how many messages you haven't read yet. On a phone it shows on the Menu button. Inside Messages, each conversation with something new has its own number. It clears as soon as you open the conversation.
When someone writes to you, the bell at the top shows it, for example New message from The board, with the start of the message. Press it to open the conversation. New posts in a group space show as New in Community.
If your association has Messages from the board, the board or the property manager may send one message to every unit owner. It shows in Messages as a conversation with The board (or The property manager), with a red number, and in the bell. You can reply there; only the board or the property manager sees your reply.
When someone writes to you privately, you get an email with a link to the conversation. Reply on the website, not to the email.
To choose how often you get these emails, press Email settings on the Messages page: an email for each message, one summary each morning, only new conversations, or never. Residents get an email for each message unless they change it; the board and property managers get the morning summary.
Under a conversation, press Email me this conversation to get a full copy sent only to you. Press Mute emails for this conversation to stop emails for that one conversation.
Writing to another household for the first time sends a message request. Type a short first message and press Send request. They're told they have a request and can press Accept or Decline. You can write more once they accept. If they decline, you see a polite note that they aren't taking new messages; you can still write to the board. You can send up to 5 requests a day.
When someone sends you a request, it shows at the top of Messages under Waiting for you, and in the bell. Press Accept to start chatting, or Decline. Declined requests are kept under Declined, where Accept messages from this unit again changes your mind. To stop messages from a household you already accepted, press Stop messages from this unit.
Once you're both in, a conversation works like a chat: new messages appear by themselves, and pressing Enter sends (Shift and Enter starts a new line).
To start a group, press New group, give it a name and type the units, for example 207, 412. People you add get an invitation and choose Join the group or No, thanks. Anyone in the group can press Add people; up to 20 can be in one group. Press Leave this group to leave.
When no conversation is open, Messages starts with a summary: Waiting for your answer, New for you, and, for the board and property manager, What you sent with how many units saw each message and how many replied.
In a private conversation, Seen and a time show under your message once the other side has opened it. In group spaces such as Community, the board and property managers see how many units opened the space since they posted. Other residents never see who read a group space.
6. Put the site on your phone
It works like an app, with no app store needed. Open your association's website on your phone.
iPhone: in Safari, press the Share button, then Add to Home Screen, then Add.
Android: in Chrome, press Add to home screen when the site offers it, or open the menu with three dots and press Install app.
The icon on your home screen opens the site straight away. Long-press it on Android for a Report a problem shortcut.
7. Buy, sell and find homes
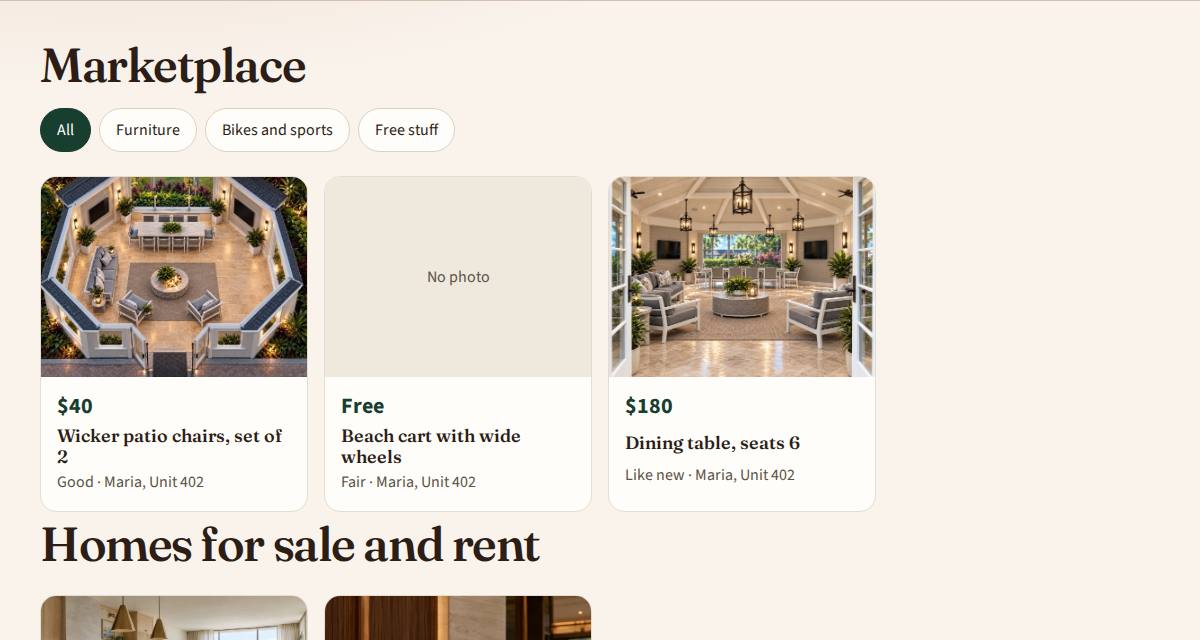
Marketplace is for items between neighbors, including free things. Items are sorted into categories: Furniture, Home and kitchen, Electronics, Bikes and sports, Clothing, Kids, Bags and luggage, Free stuff and Other. Each category shows photos of what's in it. Press a category to see only those items, or search by name. Open an item to see its photos: swipe, press the arrows, or press a small photo below to see it large.
To sell something, press Sell something and choose the category that fits best. If you picked the wrong one, open My listings, edit the item and change the category.
To buy something, open the item and press I'm interested. You can add a note, such as when you could pick it up. This opens a private conversation with the seller in Messages. The seller gets a confirmation email with your name, unit and note, and a button to reply to you. Nobody's email address is shown.
Homes for sale and rent shows units listed by owners in the building.
8. Zoom in on a photo
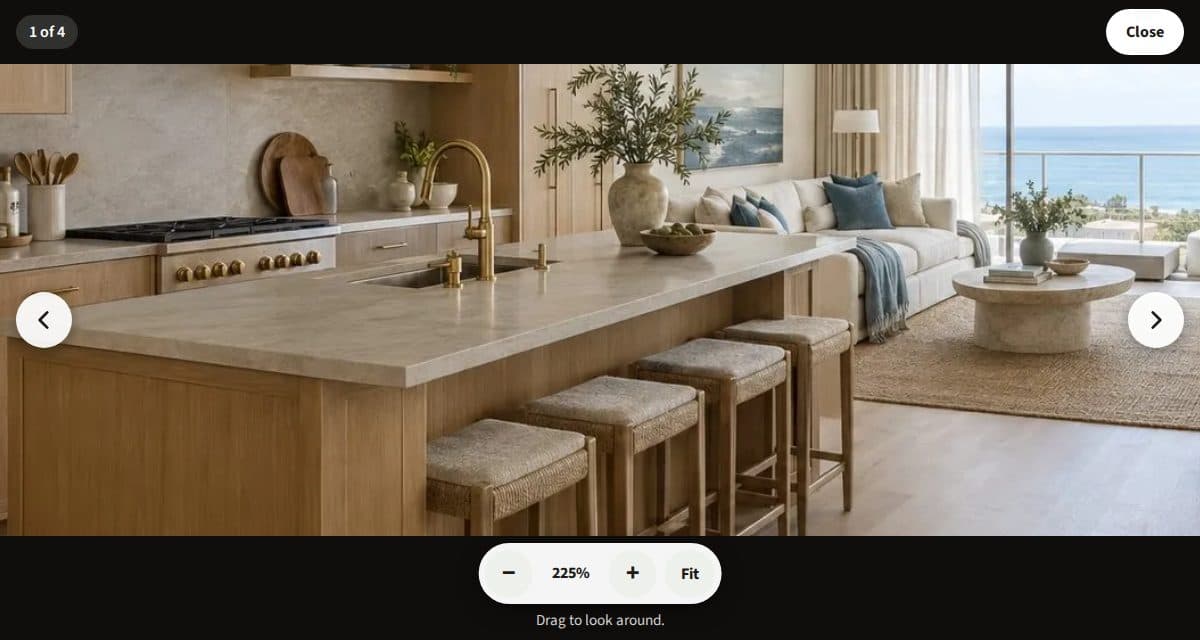
To look closer at any photo in the marketplace, homes for sale or design reviews, press Zoom in the top corner, or press the photo itself. The photo opens on the whole screen.
Press + to zoom in and - to zoom out. You can also double-tap the photo, or pinch it with two fingers on a phone or tablet. The number between the buttons shows how close you are.
When you are zoomed in, drag the photo with one finger or the mouse to look around. Press Fit to see the whole photo again, and Close to go back.
9. Ask the assistant
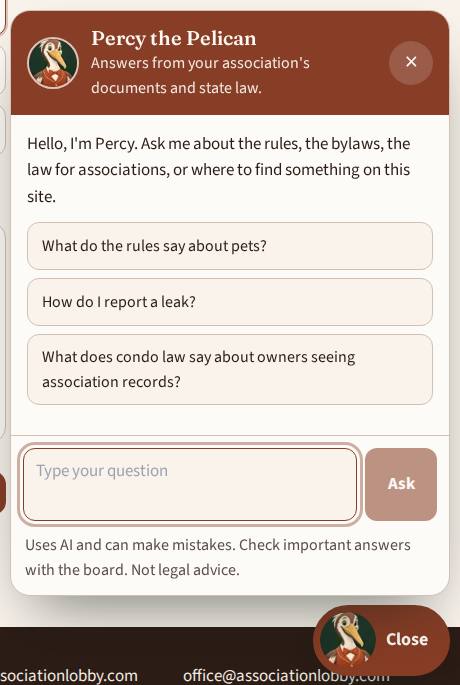
Press the round button with the character in the bottom corner, for example Ask Percy.
Type a question in your own words, such as "What are the pool rules?" or "Where do I report a leak?". The answer comes from your association's rules and documents, and from state law. Each answer lists where it came from.
In Florida, state law means the law for your kind of association: the condominium law for condos, the homeowners' association law for HOAs and the cooperative law for co-ops, plus the state's rules for each and for licensed community association managers. Condos and co-ops also get the milestone inspection law. Questions about renting a unit, such as "Can I rent my unit?" or "Can we limit short-term rentals?", get the sections on rental limits, approval fees and tenants. Your own declaration and rules can say more, so the answer checks them too.
It also answers how to do things on this website, from the steps in this guide. Ask it to open a page, such as "Let me see the lobby designs", and it takes you there. Otherwise, press the Go to button under the answer. Check important answers with the board. It is not legal advice.
To report a problem, tell it what's wrong, such as "The hallway light on my floor is out". It fills in the request for you to check, and nothing is sent until you press Send to maintenance.
If you ask for a record that isn't shared with residents, such as an invoice or a contract, it explains how to make an official records request and takes you there.
10. Ask for official records
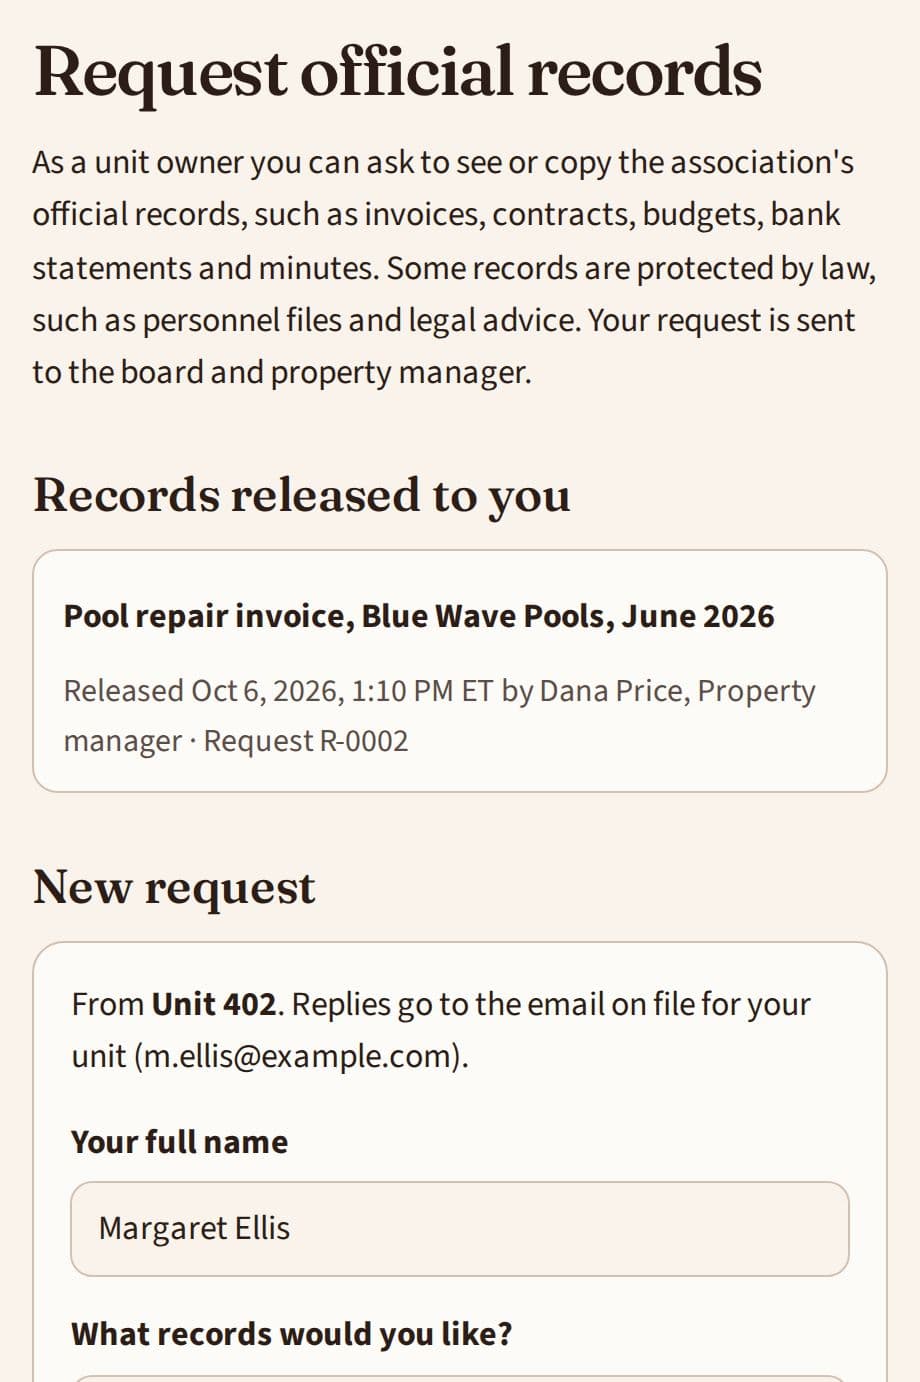
Unit owners can ask to see or copy the association's official records, such as invoices, contracts, budgets, bank statements and minutes. Open Documents and choose Request official records, or find it under More in the menu.
Your name is filled in, and your unit and email come from your sign-in. Say what you need, with dates if you know them, and how you'd like to get it: a copy on this website, a copy by email, or looking at the records in person. Check the box and press Send my request.
Your request gets a number, such as R-0003, and is dated the moment you send it. Under Florida law the association has 10 working days to respond. The page shows the due date.
Follow your request under Your requests. When the board or property manager releases a record, it appears under Records released to you. Press its name to open it. Some records are protected by law, and the board will tell you why if something can't be released. Tenants should ask the unit owner.
11. Vote online
If your association uses online voting, open Voting in the menu. Only owners vote, and each unit votes once. Tenants can't vote.
First choose how you'd like to vote: online on this website, or on paper. You can test your phone or computer; the test doesn't cast a vote.
Each vote says at the top whether it can be changed. If it says the vote is final, you can't change it after you press Send my vote. If it can be changed, open the vote again before it closes and press Change my vote; only your latest vote counts. You get an email confirmation each time. Before you choose, read the vote: some choices have a photo with a short explanation under it, and a quote you can open. Documents for the whole vote are listed under Read before you vote.
To see results of earlier votes, open Voting and scroll to Past votes and results. Choose a category, such as Landscaping or Exterior doors, to see only those votes. Each result shows how many units chose each option. How each unit or person voted is never shown.
When a vote opens you get an email. Open it, make your choice, check the box and press Send my vote. You get a receipt code by email. Enter it on the vote's page to check that your ballot is counted. On a secret ballot, nobody can see how you voted.
12. Run for the board
When the board starts the annual election, you get a first notice by email. Open Voting, then the election, and press Sign up to run before the sign-up deadline.
Add a photo of yourself, a short statement, and if you like a one-page information sheet (letter size, as a PDF or a photo of the page). Confirm the eligibility statements and press Sign up to run. You get an email confirmation.
You can change your photo, statement and sheet until the sheet deadline, or withdraw before the board decides. If there aren't more candidates than open seats, no vote is needed. If there are, your photo, statement and sheet go on the ballot.
13. Add your photo and meet the board
Open My page in the menu, or press your unit at the top of the page, then press Add my photo. Choose a photo from your phone or computer.
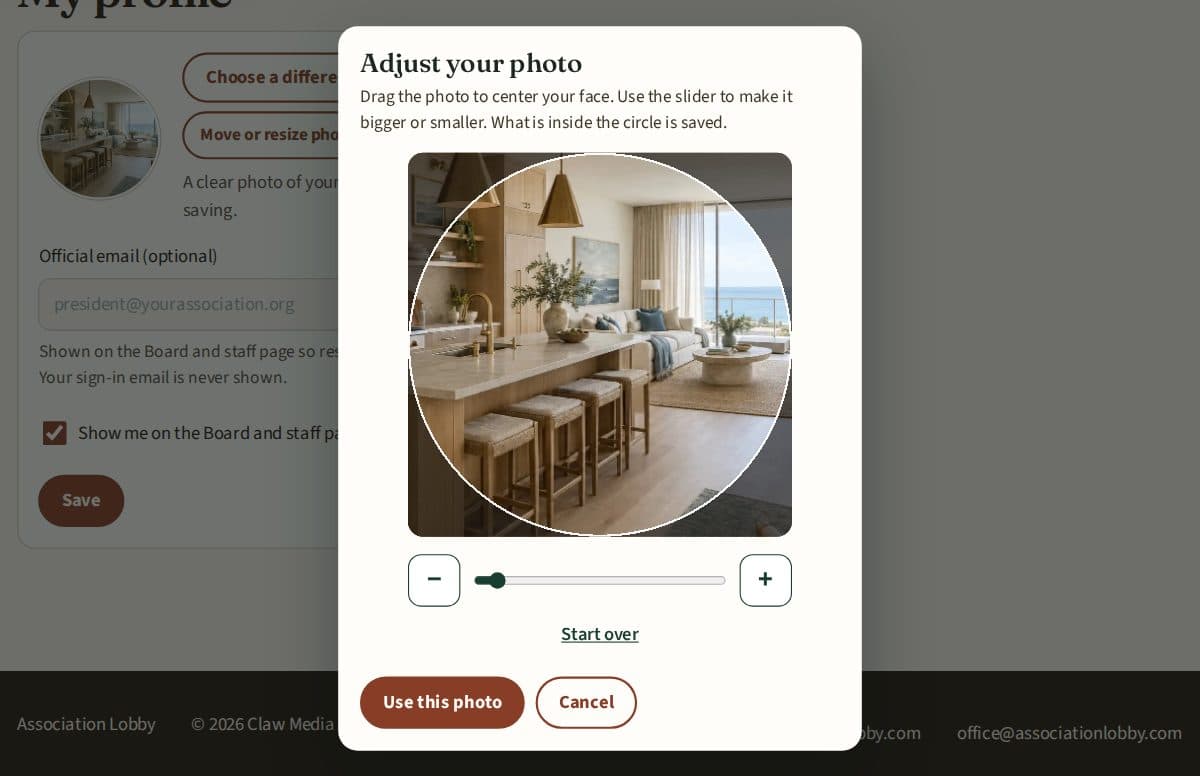
A window opens. Drag the photo to center your face, and use the slider or the + and - buttons to make it bigger or smaller. On a phone you can also pinch. What is inside the circle is saved. Press Use this photo, then Save.
To fix a photo you already have, press Move or resize photo.
Open Board and staff to see the board members, the property manager and maintenance staff, with their photos and official email addresses.
14. See everything you posted on My page
Open My page in the menu, or press your unit at the top of any page. Only you can see it.
At the top, a box says how many things need you today, such as reading the board's answer to a request, signing up for pest control, or answering a message request. Press any of them to go straight there. When nothing needs you, it says You're all set.
Type in What are you looking for?, for example pool hours, and press Find it. The assistant answers, or, if it isn't turned on, Documents opens with what you typed. The buttons below it, such as Trash and recycling, ask common questions for you.
Below that, a door for each part of your home here: My requests, Pest control, Messages, My bookings, Repairs, Documents, My listings and My household. Each one has a light and a few words: red means it needs you, blue means something is new or coming up, and green means all set.
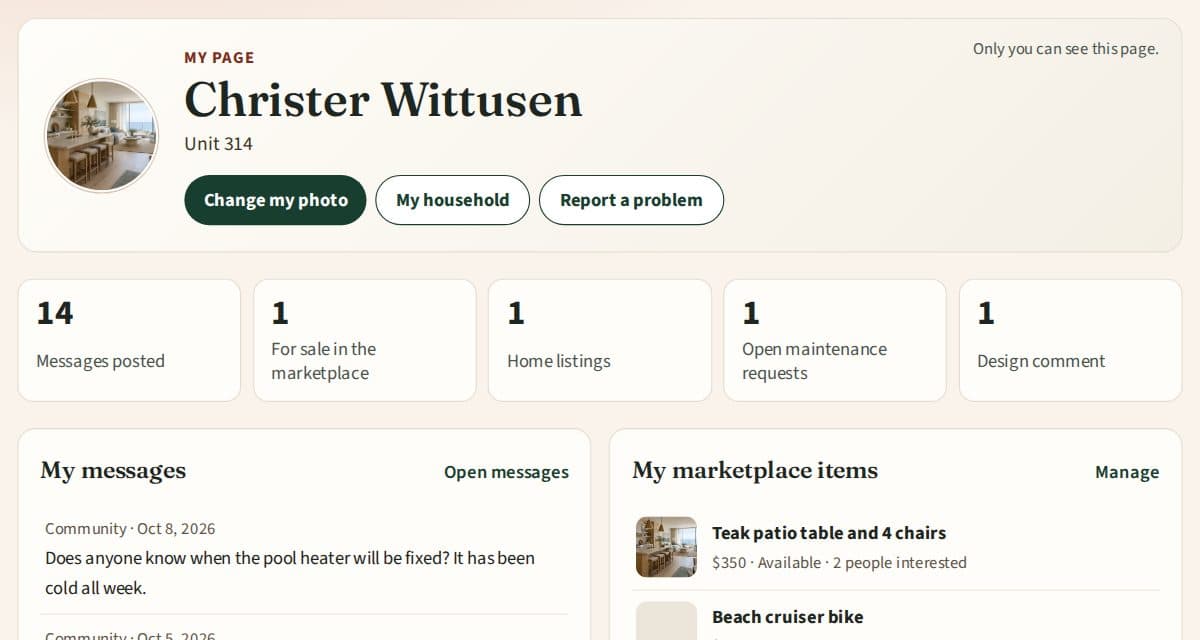
Everything in detail, further down, shows your photo, the messages you posted, what you have for sale in the marketplace, your home listing with how many people wrote to you, your maintenance requests and your comments on design photos. Press any item to open it.
15. When someone wants your item
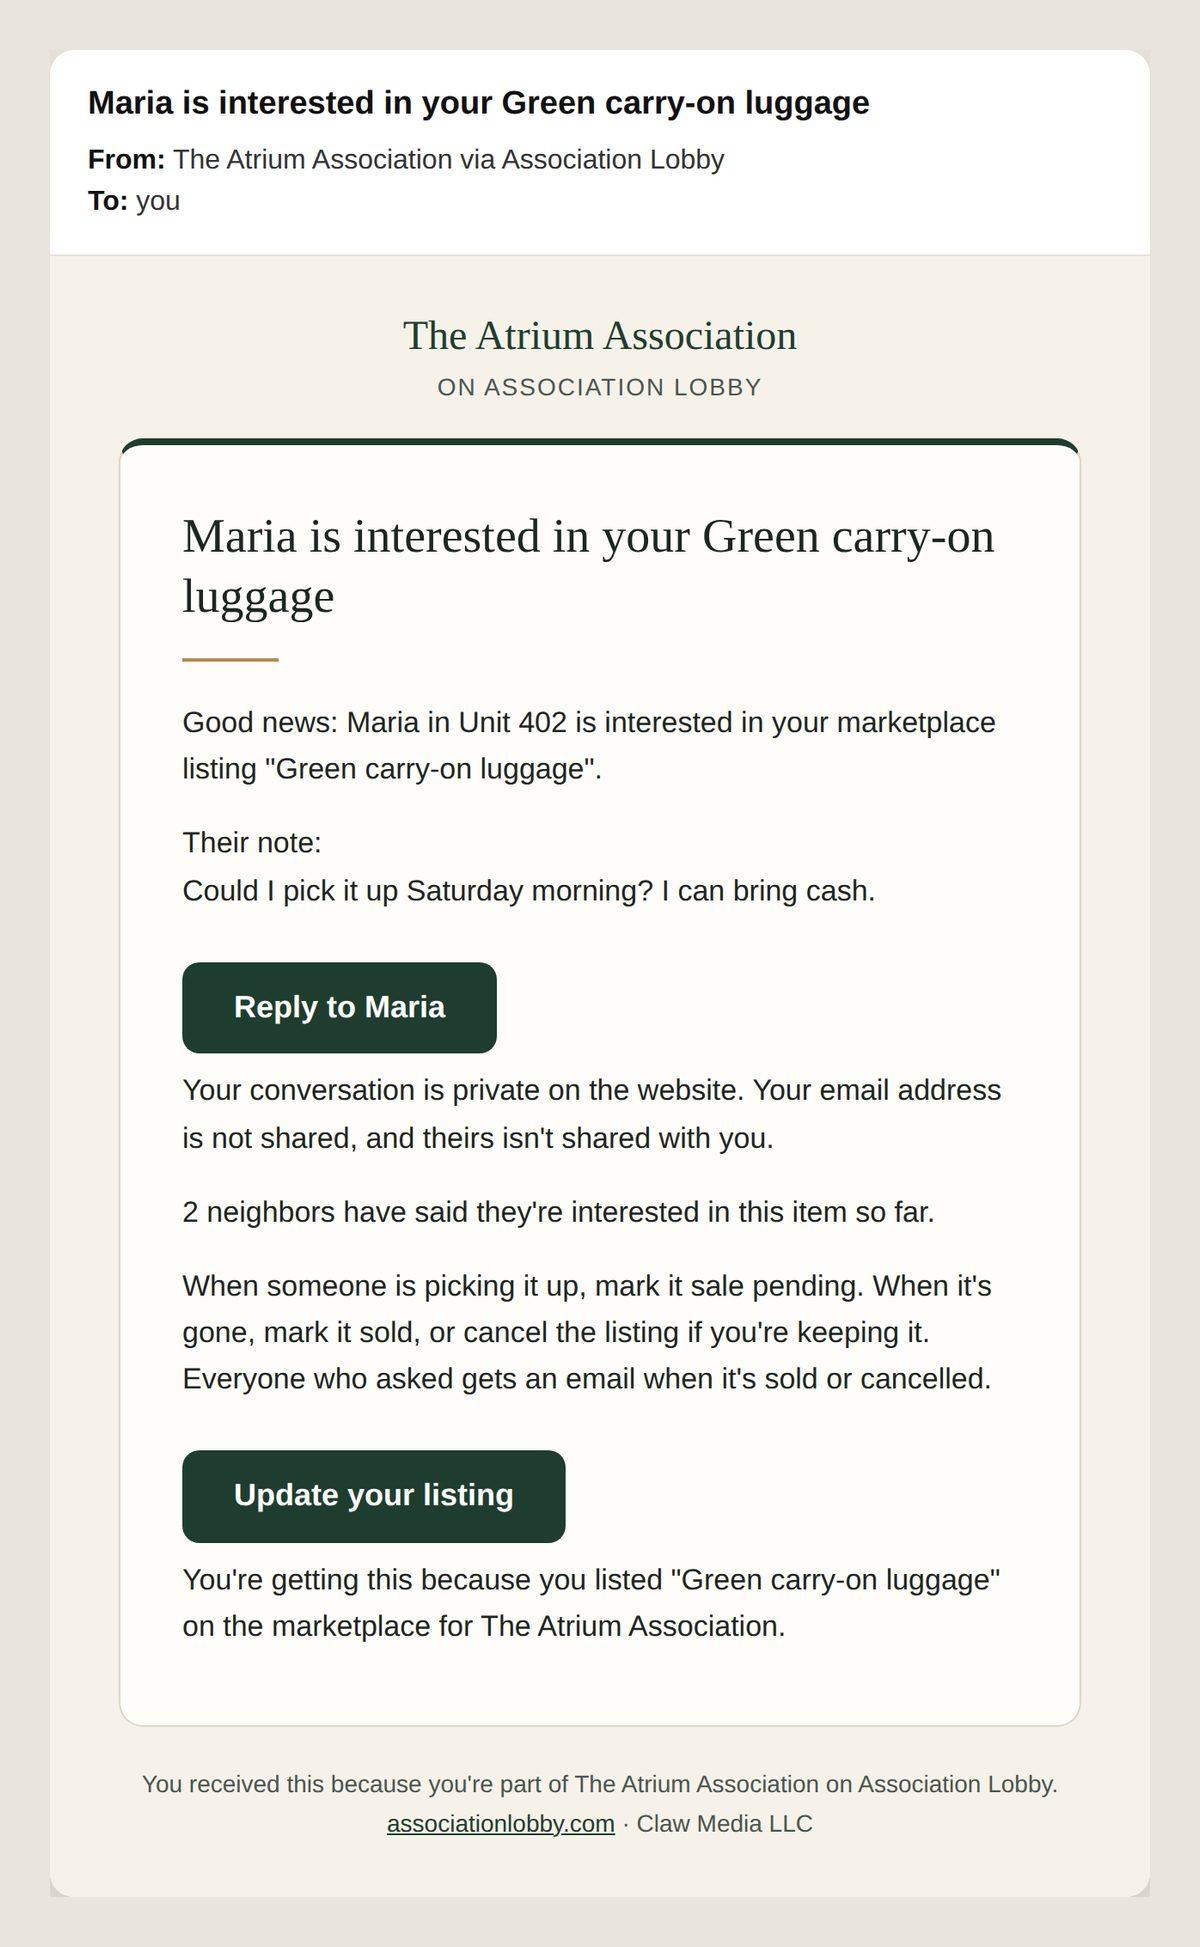
When a neighbor presses I'm interested on something you listed, you get an email right away, like the one below. It shows their name, unit and note.
Press Reply in the email to answer them privately in Messages. Neither of you sees the other's email address. Open My listings to see everyone who asked.
Then keep your listing up to date: press Mark as sale pending when someone is picking it up, Mark as sold when it's gone, or Cancel the listing if you're keeping it. Everyone who said they were interested gets an email when it's sold or cancelled.
16. Read the newsletter and get it by email
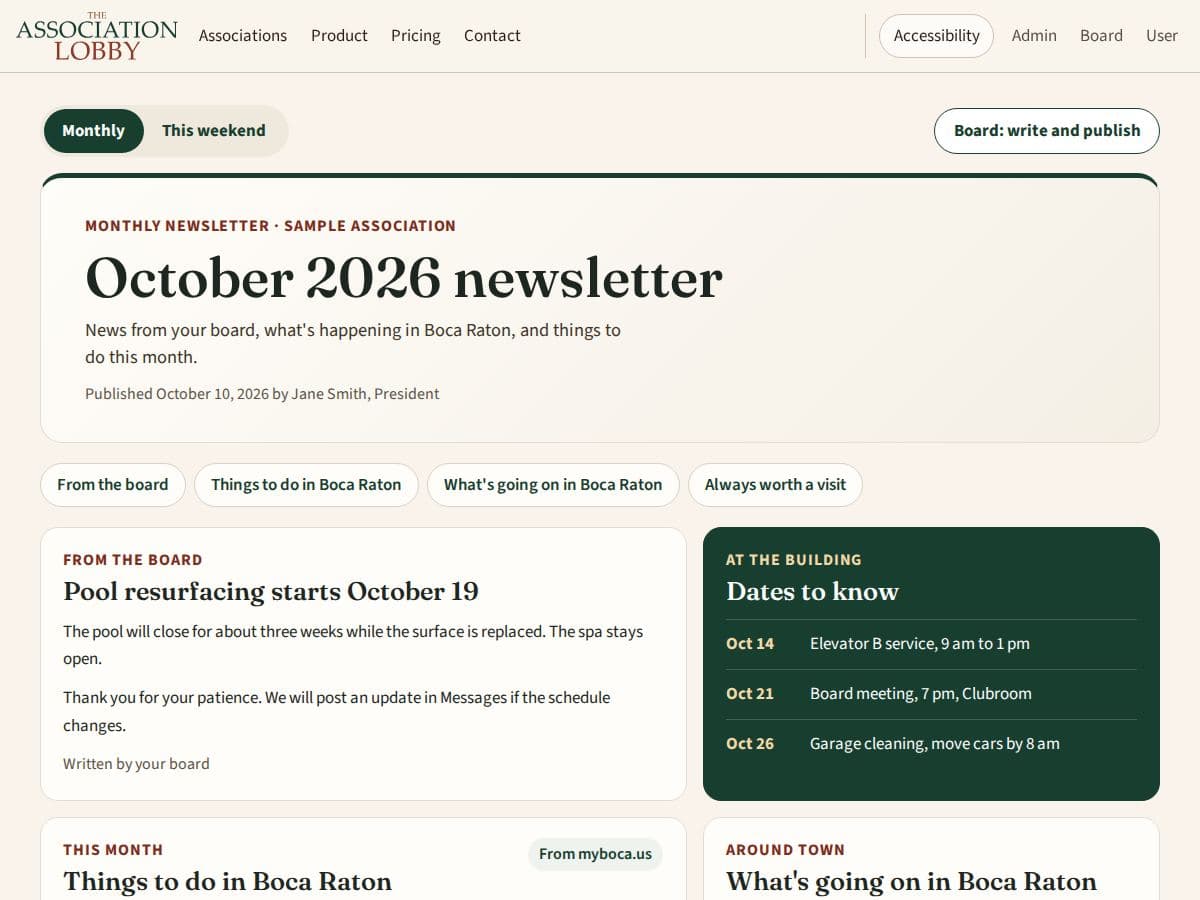
Open Newsletter in the menu. The top row shows Today at a glance: today's weather, any city notices (press Read all to see them), and the hurricane season line. Below that, two big buttons switch between This weekend and This month. Events are grouped by day, so you can see Friday, Saturday and Sunday at a glance. Past issues are at the bottom, split into Weekend issues and Monthly issues. Monthly has news from the board, dates to know, and what's going on in your city. This weekend is a short issue with events nearby and the forecast. A small weather character shows each day at a glance: a sun, a cloud, a rain cloud with an umbrella, or a storm cloud. Around Halloween, Thanksgiving, Hanukkah, Christmas, New Year, Purim, Passover, Rosh Hashanah and the Fourth of July the characters dress for the holiday.
Under Weather, On the water has a short note for boaters each day from a captain character: smooth sailing, choppy, or better to stay at the dock. When the National Weather Service has a High Surf Advisory, a surfer shows instead. It's a general guide from the land forecast, so always check the marine forecast before heading out.
On the water is on to start. To hide it, press the round settings button (the gear) next to the On the water heading and press Boating and surf notes to turn it off. Press it again to turn it back on. Your choice only changes what you see, and it follows your sign-in: turn it off on your computer and it's off on your phone too.
The page stays current on its own. Every night after midnight it gathers the latest city news and events for the coming weekend and month, and the weather refreshes about every 30 minutes during the day. City notices shows advisories from the city, such as beach or water notices, and Hurricane season shows a line from the National Hurricane Center. Until the board publishes an issue, you see the gathered local news, events and weather with a note that says so.
To get it by email, tick Monthly newsletter, This weekend, or both, and press Sign me up. It goes to the email the association has for you. Emails go out only after the board publishes an issue. After that, the Newsletter page opens straight on the latest issue.
To change what you get or stop, open My profile and go to Newsletter emails. It shows the date and time you signed up. The link at the bottom of any newsletter email stops them too.
You can also ask the assistant things like "What's fun to do this weekend?" It looks at local events, places and the weather near the association.
17. Reserve the clubhouse or another space
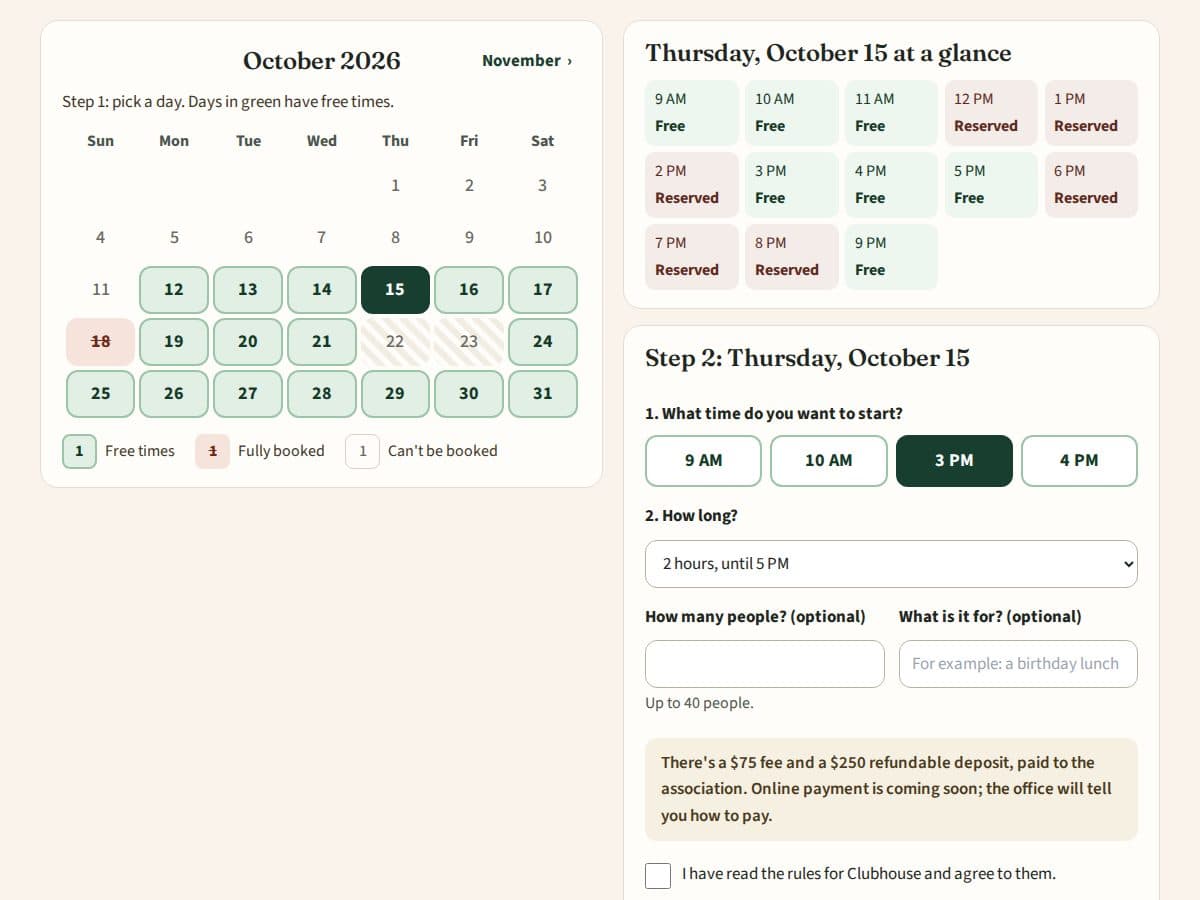
Open Reservations in the menu (under More, then Ask or report, on a computer). You see your own reservations first, then every space you can reserve, with its open hours, how long you can book, the notice needed and any fee or deposit.
Press Pick a day. Days in green have free times; crossed-out days are fully booked. Pick a day, then pick the time you want to start and how long. Taken hours show as Reserved, never who reserved them.
Read the rules, tick that you agree, and press Send my request. The time is held for you while the board or property manager looks at it, and you get an email when they approve or decline. You get reminders before the day.
Fees and deposits are paid to the association; online payment is coming soon. To cancel, open Reservations and press Cancel this reservation. Your reservations also show on My page.
18. Sign up for pest control
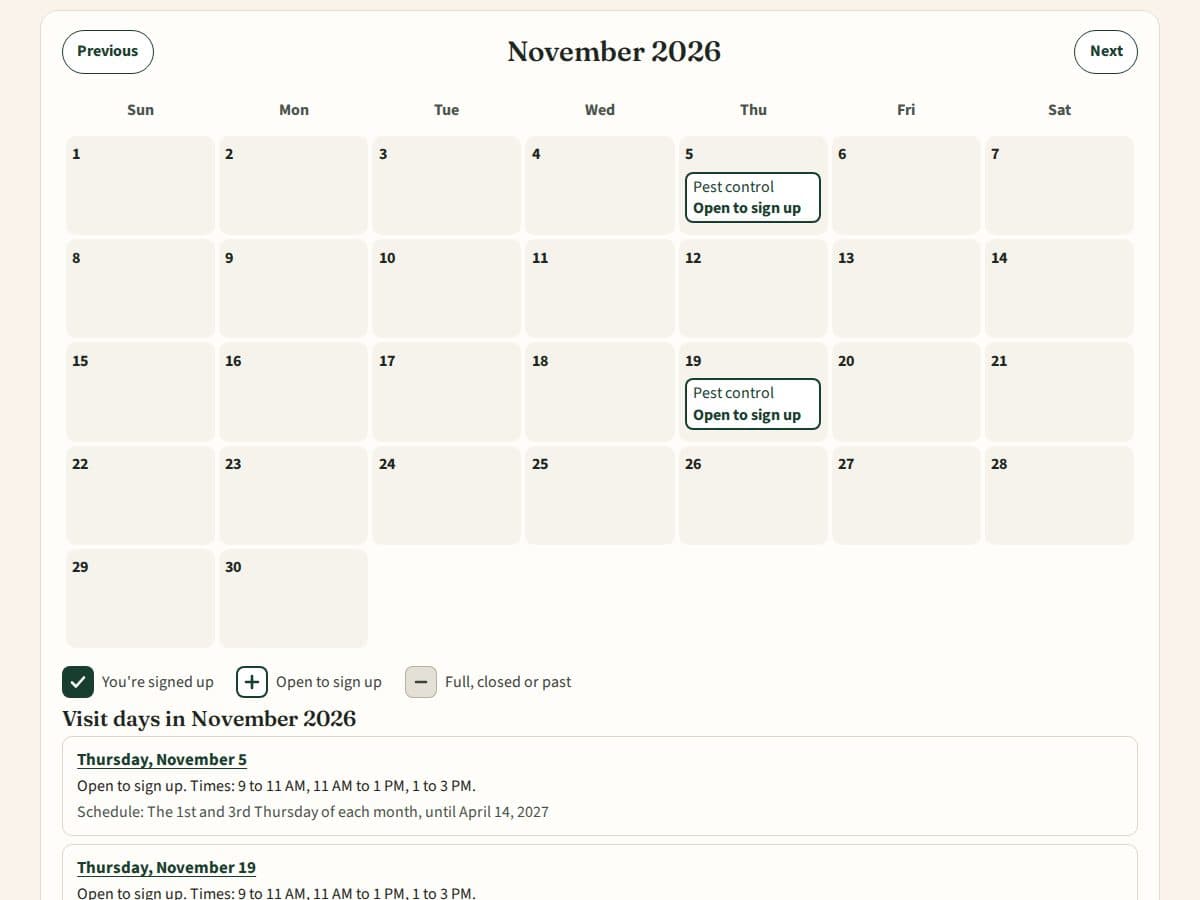
Open Pest control in the menu (under More on a computer). You see a calendar of the month. Days you're signed up for have a dark box with a check mark, days you can still sign up for have a white box with a plus sign, and full, closed or past days are gray. Press Previous or Next to change the month. The same days are listed under the calendar.
When pest control comes on a schedule, such as the 1st and 3rd Thursday, every visit day is on the calendar. Sign up for each day you want.
19. Pick a time for your unit
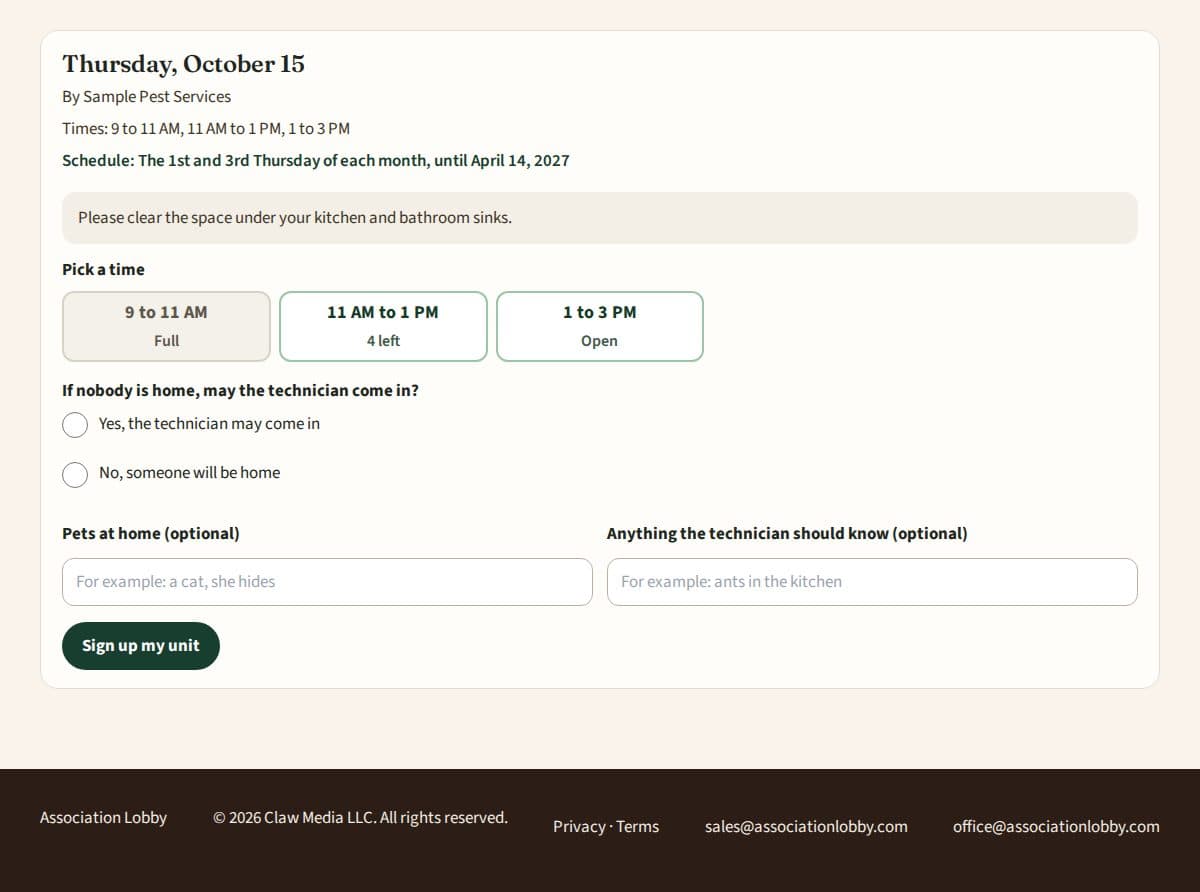
Press a day on the calendar. Its page shows the company, the time windows and a note from the board, such as clearing the space under your sinks.
Pick a time. Full times are grayed out. Then say whether the technician may come in if nobody is home, add any pets and anything the technician should know, and press Sign up my unit. Owners and tenants can both sign up.
You get an email right away and reminders before the visit. To change the time or cancel, press the day on the calendar again, or the link under Unit is signed up for. Sign-ups close the day before the visit; after that, call or message the office.
20. Find a vendor the association uses
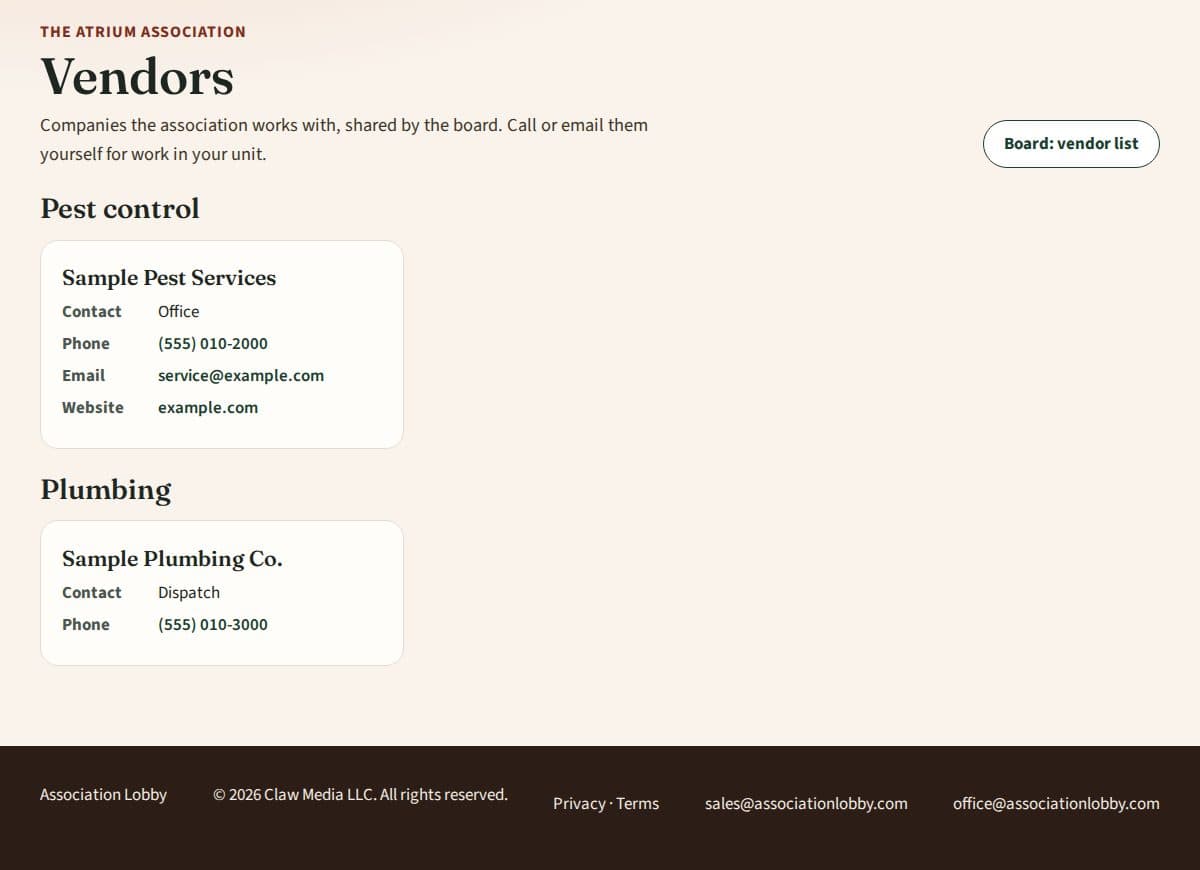
Open Vendors in the menu (under More on a computer). You see the companies the board shared, grouped by what they do, with the contact person, phone, email and website. Tap a phone number to call.
The board can also email one vendor's contact straight to your household.
21. Reminder emails
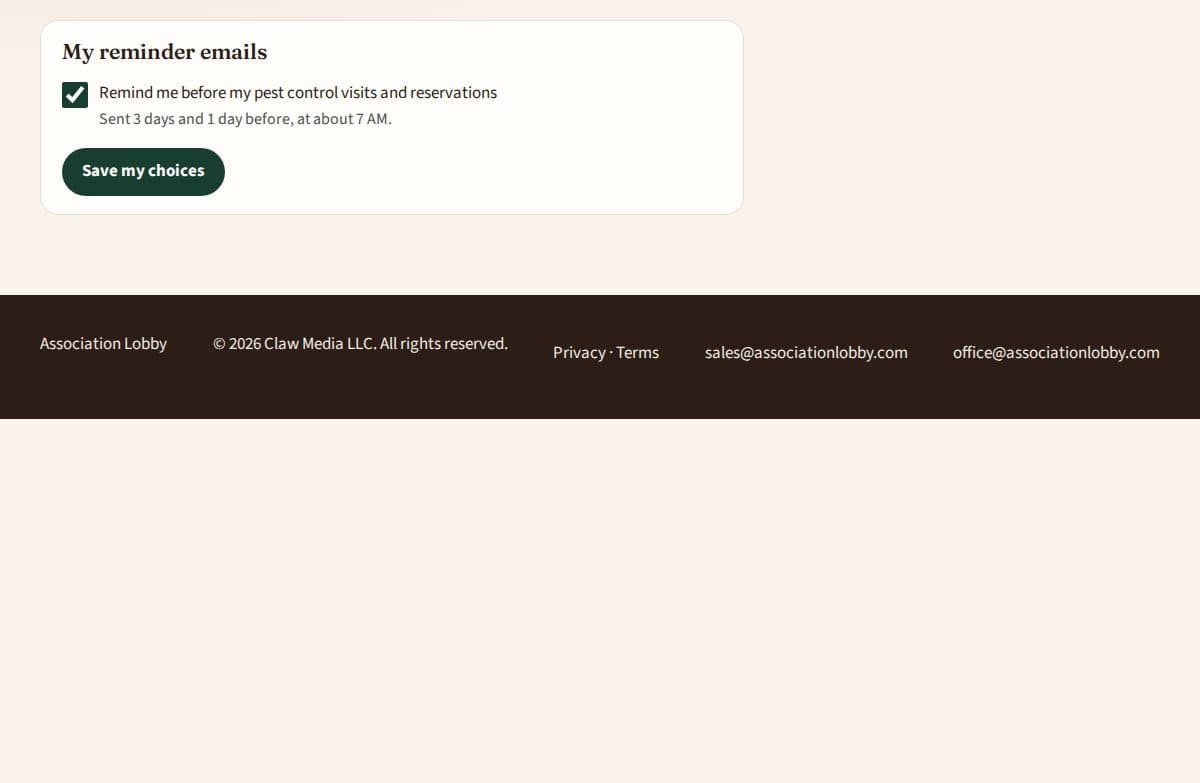
When you sign up for pest control or reserve a space, you get an email reminder before the day, at about 7 AM. The board picks the days, usually 3 days and 1 day before.
To stop them, open My profile, untick Remind me before my pest control visits and reservations, and press Save my choices.
22. What the board and property manager can see
To help everyone get started, the board and property managers see which units have signed in, when each person first signed in and when they last visited. In a private conversation, both sides see Seen once the other has opened it. They never see your password, what you read in Documents, or how you voted on a secret ballot.
Other residents never see any of this. The privacy notice explains it in full.
Only owners can change the household: the unit number and who is listed. A renter listed under a unit can sign in and use the site, but can't add or remove people.
23. Ask the board before you change your unit
Many changes need the board's approval first, such as new windows, doors, flooring or work by a contractor. Open Ask for approval in the menu (under More, then Ask or report, on a computer) and press Start a new request.
Fill in the four parts: about you, the work you'd like to do, the supporting papers, and agree and sign. Press Choose files to attach the contractor's certificate of insurance and any sketch, drawing, brochure or photo. PDFs, photos and Word or Excel files up to 25 MB each are kept at full quality. Next to each file, pick what it is. Sign by typing your full name, then press Send to the board.
Allow two weeks for the board, and don't start until it's approved. When the board decides, you get an email and a notice at the top of My page, and My page shows a number in the menu until you open it. Board approval is not a building permit.
When the approved work is finished, open the request and press The work is finished, so the office can schedule the final inspection. Prefer paper? The Approval requests page links to the printable form when the association has shared one in Documents, then Forms.
24. Check the bell for what's new
The bell at the top of every page shows a red circle with a number when something is new for you: new pictures in Design review, a picture you commented on that was updated, a project the board told you about, an answer to your approval request, or unread messages.
Press the bell to see the list. Press a line to open it. Press the letter on the left to mark it read; press it again to mark it unread. Unread shows only the new ones, and View all opens the full list.
Read notifications move to the archive after 7 days. The archive is at the bottom of the View all page. My page also shows what's new under New for you.
25. See the project calendar
Open Project calendar in the menu to see work the board has scheduled around the building, such as painting, roof work or the pool being closed. Happening now and Coming up are at the top, and the month calendar is below. Press Previous and Next to change the month.
Press a project for the dates, the hours, where it is and what you should know. When the board wants everyone to know about a project, you get a notice in the bell, and sometimes an email.
26. Suggest a spot for a new design
Open Suggest a design in the menu, or from My page. Choose the area, or Somewhere else and say where. Write what you'd like to see, and add a photo of the spot if you like. Your photo is kept at full quality and only the board sees it. Press Send my suggestion.
The board answers in your notifications. If they make a new picture from your idea, you're told it's ready and asked for your feedback. If it's Not now, they say why. You can have 3 suggestions waiting at a time, and withdraw one before the board answers.
Under Ideas the board shared, press I'd like this too on any idea you'd like as well. Each owner counts once.
27. See and pay your maintenance fees
Once the board sets up maintenance fees, My payments shows in your menu. It tells you what you owe, when it's due and the last day to pay before a late fee. You see only your own unit.
Press Pay now to pay by card or bank account. You pay on the association's own Stripe page, and the money goes to the association. A bank payment shows as Waiting on the bank for a few days. You can also pay the next one early.
What I paid lists every payment with the date and how you paid, including checks the board recorded. Charges lists each fee, what is still owed and if it's late. If the board turned reminders on, you get an email a few days after the due date while it's unpaid. Paying by check still works.
For the board and the president
Board tools are in the menu under Board tools, in groups by task. Property managers see Manager tools. Your dashboard shows what needs attention.
1. Sign in as a unit owner
Board members sign in like every owner: press Unit owner sign-in at the top and enter your unit number and email. The site sees that your unit holds a board office.
A bar at the top says You're on the board. Press Email me the board link, then open the email on the same phone or computer. Your board tools open: the president gets the president's settings, and the other offices get the board desk, documents and records requests.
The link is needed because a unit number and email alone don't prove who you are. Roles are set under Board tools, then Board and staff roles.
Like every owner, you land on My page. At the top, a bar says You're on the board. Switch view: press Board view to open the board desk, and My page to go back to your home. The same bar is at the top of the board desk.
2. Start on your dashboard
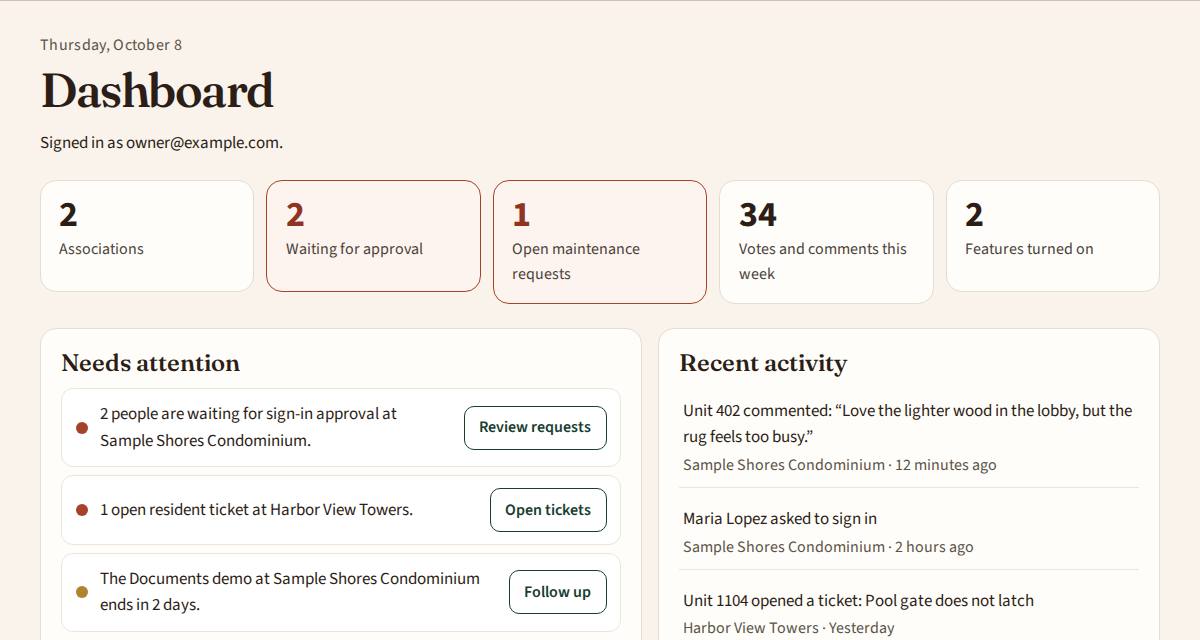
Press Board view at the top of My page. The board desk lists sign-in requests to approve, open maintenance tickets and recent activity.
Press a button next to an item to go straight to it.
3. See every vote and note
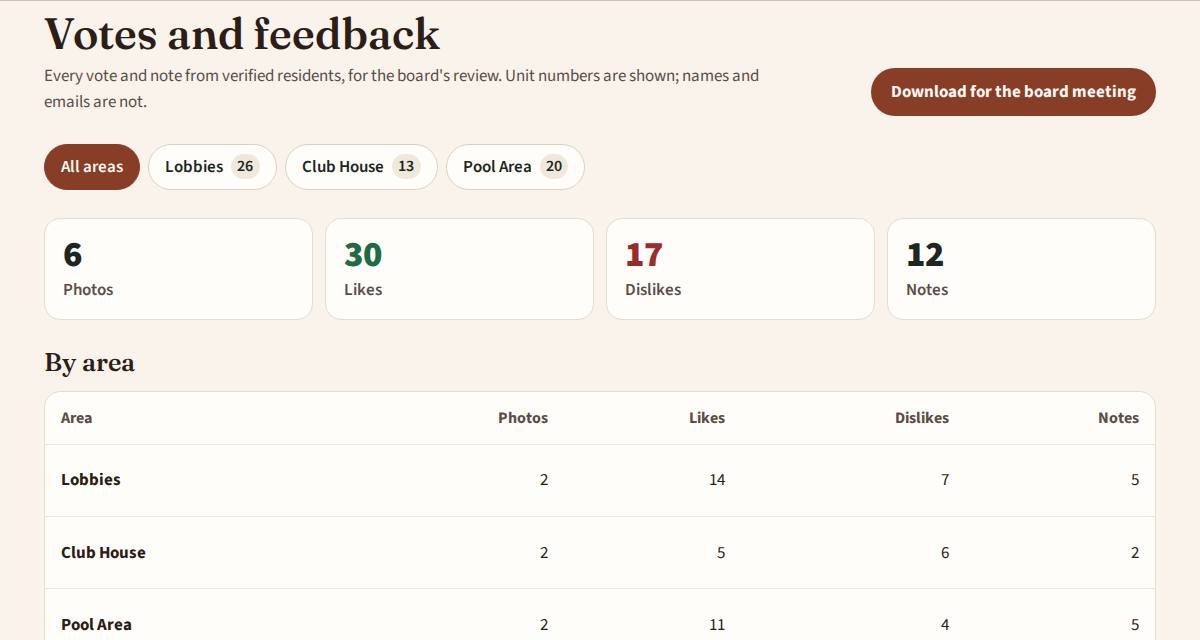
Open Board tools, then Votes and feedback. It shows each area, the photos ranked by support, and every resident note.
Press Download for the board meeting to get a spreadsheet.
4. Add and arrange photos
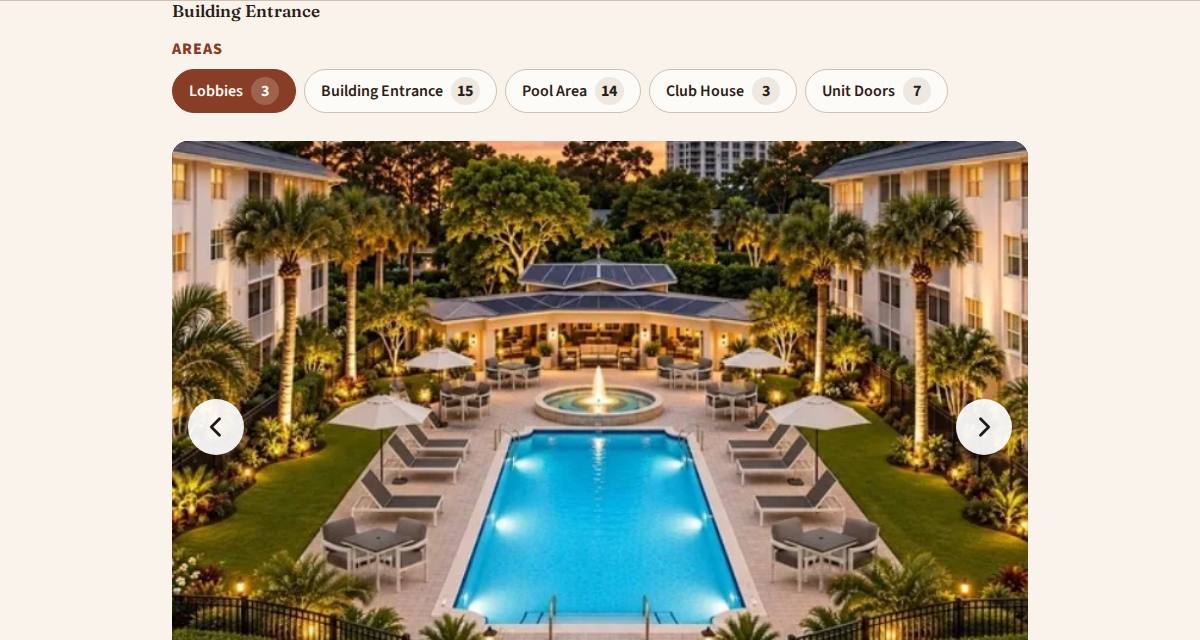
Open an area and choose Add photos. Pick pictures from your computer or phone.
Use Arrange photos to put the best ones first. Drag a photo up or down by its grip (the six dots), or use Up, Down and To top, then press Save order.
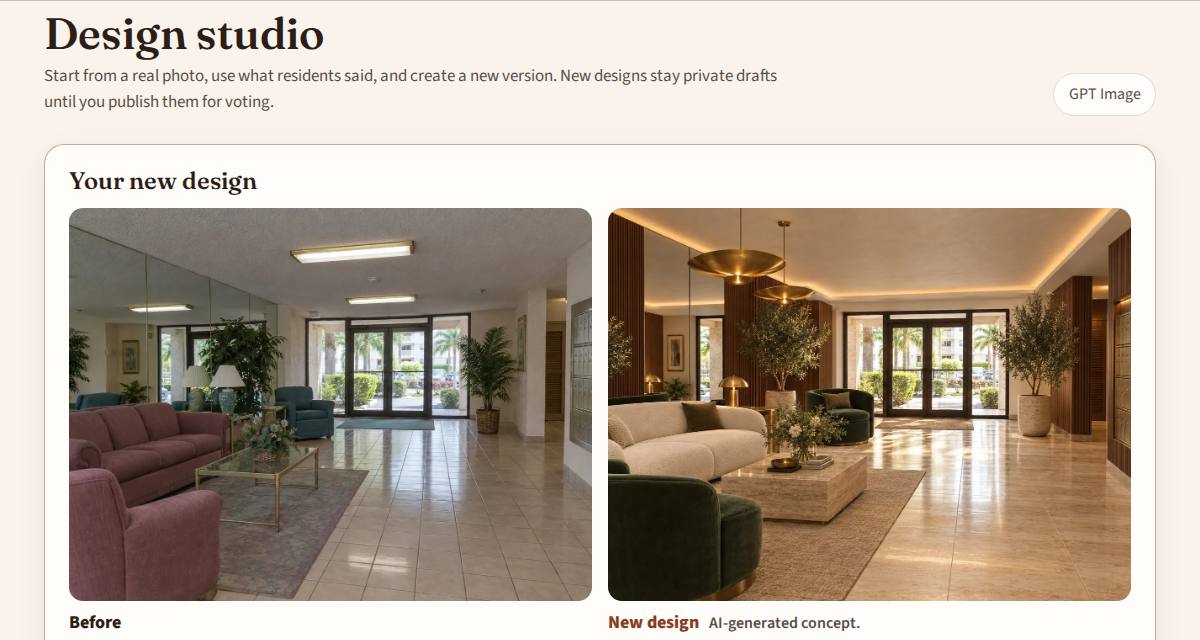
5. Make a new design in the Design studio
Image generation is turned on for your association by Association Lobby. Once it's on, the board and property managers find Design studio under Board tools, using Staff sign-in.
Choose an area and a photo, start from what residents said, pick a style, and choose which AI makes the picture: Grok or ChatGPT. Then press Create a new version of this photo.
New designs stay as private drafts until you publish them for voting.
6. Share documents
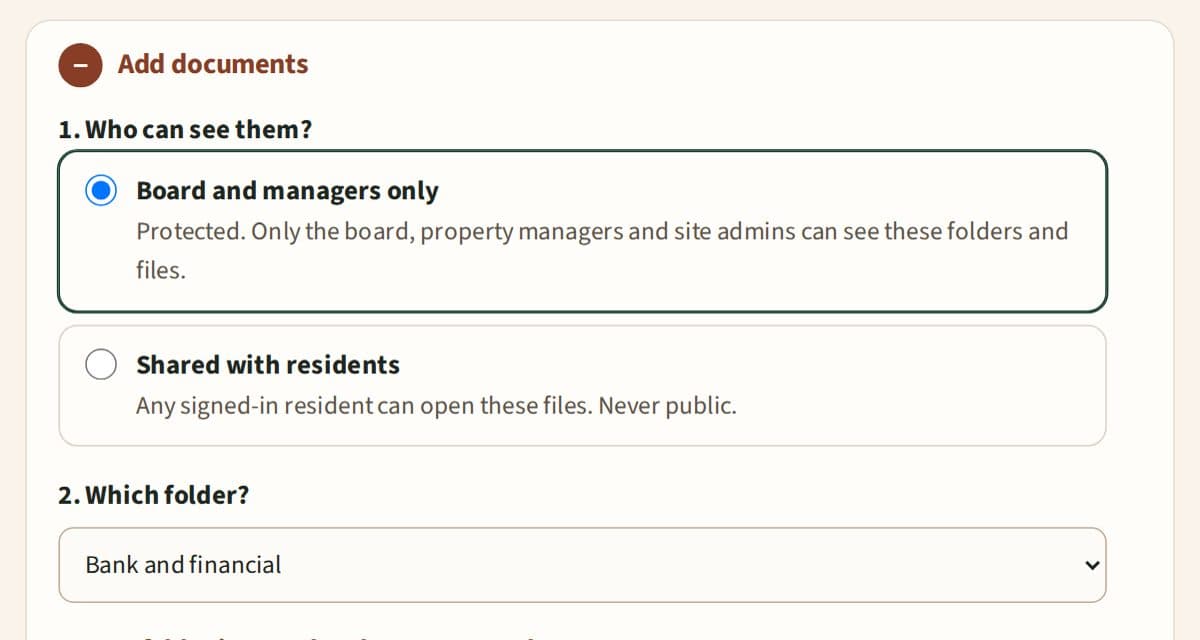
Documents has two areas. Board and managers only is protected: residents can't see its folders or files. Shared with residents is for files any signed-in resident can open. Nothing is public.
Press Add documents. First choose who can see the files, then the folder in that area, then the files. A note shows exactly where they will go before you press Upload. To make a new folder, press New folder and choose where it goes.
Open a folder to see its files and the folders inside it. Under Manage this folder you can add a folder inside it (up to 3 levels), rename it, or remove it once it is empty. To move a file, press Edit or move and choose another folder. Moving it into a Board and managers folder hides it from residents right away.
Put forms owners need, such as the Approval Request Form for changes to a unit, in Shared with residents, then Forms. Every owner and renter who signs in can open them, and the assistant can point people to them. Owners can also send the request online under Approval requests, and that page links to a form titled Approval Request Form for anyone who prefers paper. If the association doesn't have its own form yet, start from our fillable template.
The top of Documents shows how many files there are, how many are shared with residents and how many are board only. Use Everyone, Shared with residents or Board only to check what residents can see. Every board office and the property manager see all documents; residents see only the shared area.
7. Keep the resident list up to date
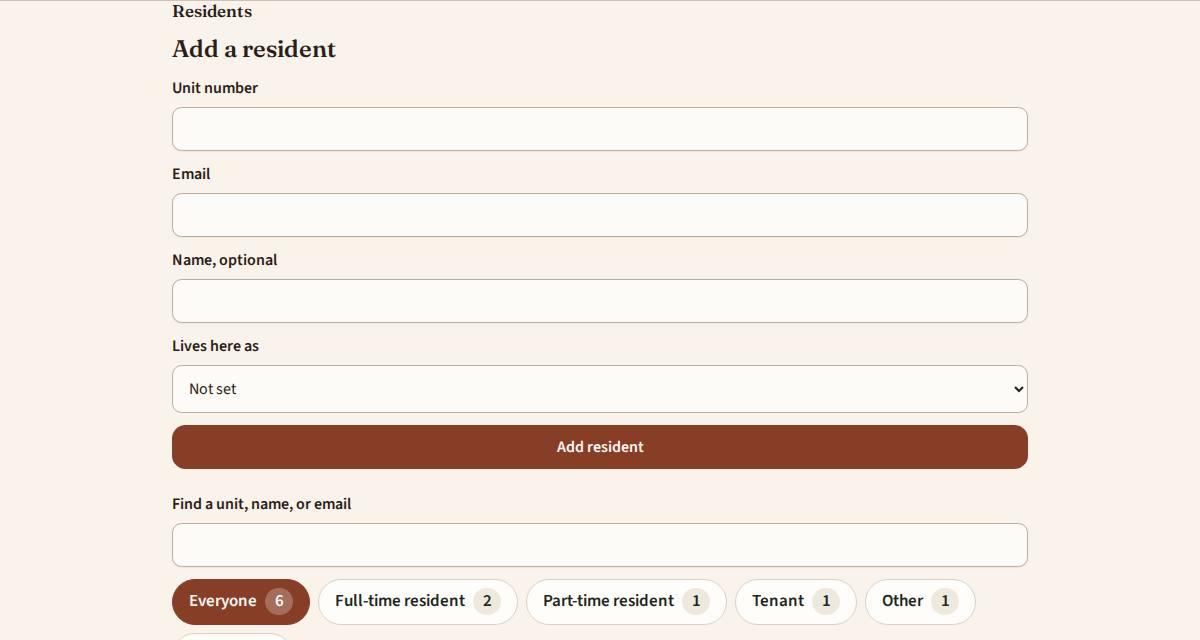
Open Board tools, then Resident list. Add a person with their unit, email and name, or upload the blank template.
Mark how each person lives here: Full-time resident, Part-time resident, Tenant or Other. Use the buttons above the list to show one group.
Pause keeps a person's votes but stops new ones. Remove deletes the person and their votes.
A seasonal or yearly renter goes under the owner's unit number and is marked Tenant. Don't make a separate unit for them, such as 403S, or the unit counts twice. Renters can sign in, but they don't vote and don't get the owners' invitation emails.
8. Set up the assistant
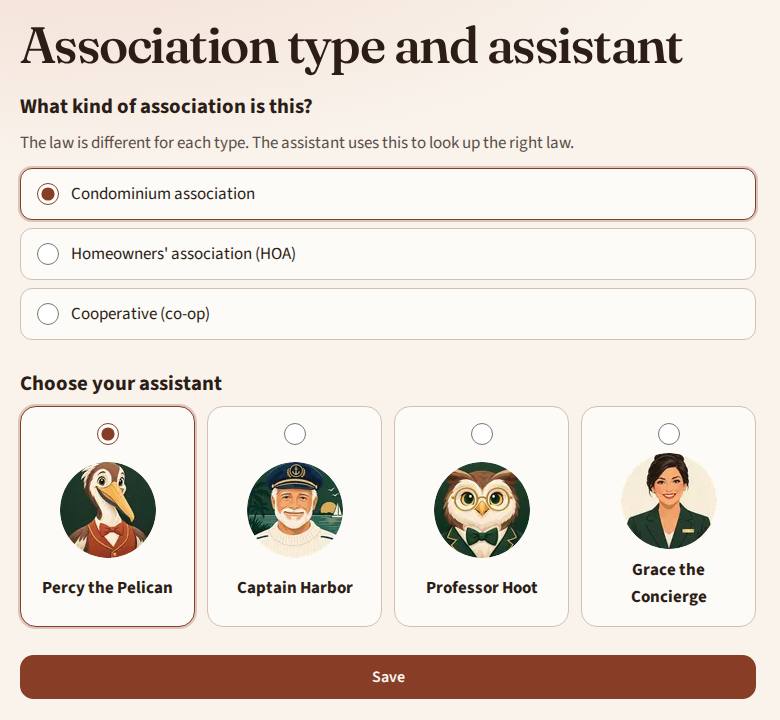
Open Board tools, then Association type and assistant. Choose Condominium, HOA or Co-op, so it uses the right law, and pick a character.
Upload the declaration, bylaws, and rules and regulations under Documents. When the rules change, upload the new version. The newest upload wins, and you can delete the old one.
Scans and photos of pages work too. The assistant reads the words from the pictures, using a few AI credits. For files uploaded earlier, open Board tools, then Association type and assistant, and press Read scanned documents.
Residents only get answers from Community files. Each answer uses a few AI credits.
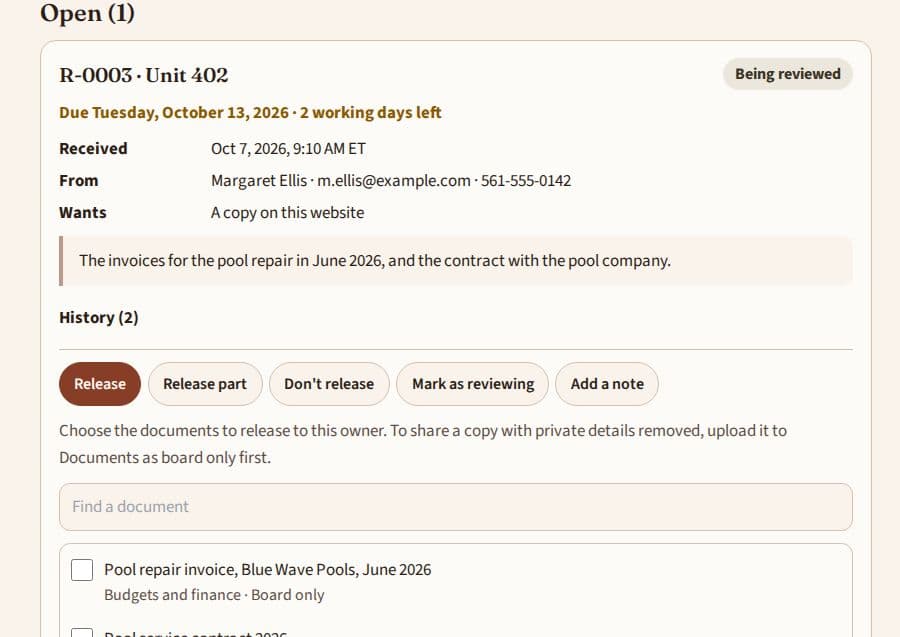
9. Answer records requests
Open Board tools, then Records requests. Open requests are listed first, soonest due first. Each one shows when it was received, the due date and how many working days are left. It turns amber at 3 days and red when it is overdue. The Board desk also shows a reminder.
To answer, choose Release, check the documents to share and press Release and close. The owner can then open them on the site. Each release saves the date and time, your name and role, and the reason, tied to the owner's request. To share a copy with private details blacked out, upload that copy to Documents as Board and managers only first, then release it.
Use Release part when some records are withheld, and Don't release when none can be shared. Both need a reason, such as a legal exemption. Mark as reviewing and Add a note keep the history up to date. Notes stay with the board.
To share a board-only file with one owner outside a request, use Release a document to a unit and write why. The release log shows every release, who released it, why, and each time the owner opened it. Stop sharing ends access but keeps the entry. Download the requests or the release log as a spreadsheet for your records.
10. Keep the yearly calendar
Open Board tools, then Yearly calendar. Press Add an item for dates the association can't miss, such as the elevator certificate renewal, fire inspections, insurance renewals, the annual report to the state or the budget. Start typing to pick a common item, or write your own.
Choose the due date, how often it repeats and when to send reminders. The board and property managers get an email 60, 30, 14, 7 and 1 days before, on the day, and if it is late. The next items show on the Today dashboard under Coming up.
When it's done, enter the date and press Mark done. A repeating item moves to its next date by itself, and the completion is kept under Recently done.
11. Run a vote online
Open Voting, then Voting settings. Check the state and record the date the board approved online voting. The page explains what your state requires first.
Press Start a new vote. Give it a category, such as Exterior doors or Landscaping: pick one from the list or type a new one, and it is saved for next time. Owners use categories to find past results. Then choose the kind of question: Yes or no, Pick one, or Pick more than one (and how many each unit can pick). Add each choice with an optional description, a photo with text under it, and a quote. Under Supporting documents, add quotes or reports for the whole vote. Owners can open all of these on the ballot before they vote. Choose whether owners can change their vote: No, a vote is final once sent (always for board elections, and where your state requires it), or Yes, until voting closes, where only the latest vote counts. Set the dates. It saves as a draft. Press Open the vote when it's ready; it can't be changed afterwards. Owners who chose online voting get an email. The page lists the units that need paper ballots.
To use photos from Design review, press Add photos from Design review under Choices. Tick the box on each photo you want (or Select all for a group); you can see how many likes each one has. Choose Each photo becomes a choice, so owners vote for the one they prefer, or Add as pictures to look at, so they appear under Read before you vote. Press Add, check the choice names, and save. The vote gets its own full-size copy, so the photo stays in Design review even if the vote is changed or deleted.
While the vote is open, the vote page, the Voting list and Today show how many units have voted and how many haven't, split by online, paper and in person, with the list of units that haven't voted yet. Some states hide this from the board until results are announced. After you announce, the results show each choice's votes, its share of ballots cast and of all units, and who voted.
Enter paper and in-person ballots on the vote's page. Results stay hidden until voting closes and you press Announce the results. Then download the vote record for your files.
To remove a draft, or a cancelled vote nobody voted in, open it and press Delete this vote. Its photos, quotes and files are removed with it. A vote that has any ballots stays in the association's records and can't be deleted.
12. Run the annual board election
Open Voting and press Start the annual board election. Enter how many seats are open (for example, all 9) and the date of the annual meeting. The page works out the deadlines from your state's rules: in Florida, the first notice 60 days before, candidate sign-up 40 days before and information sheets 35 days before.
On the election page, press Email the first notice to owners. Owners sign up on the website with a photo, a short statement and a one-page sheet. Check each candidate's eligibility; if you mark someone not eligible, they get the reason by email.
After sign-up closes, the page tells you whether a vote is needed. If there aren't more candidates than seats, press Record: no vote needed, and owners are emailed the names. If there are, wait until the sheet deadline and press Make the ballot. It makes a draft ballot with every candidate in last-name order, with their photo and sheet, where votes are final. Check the dates and open it.
13. Add your photo and official email
Open My profile, add a photo (drag and resize it to fit the circle, then press Use this photo) and enter an official email such as president@yourassociation.org. It shows on the Board and staff page; your sign-in email never does. Uncheck Show me on the Board and staff page to stay off it.
14. Put out the newsletter
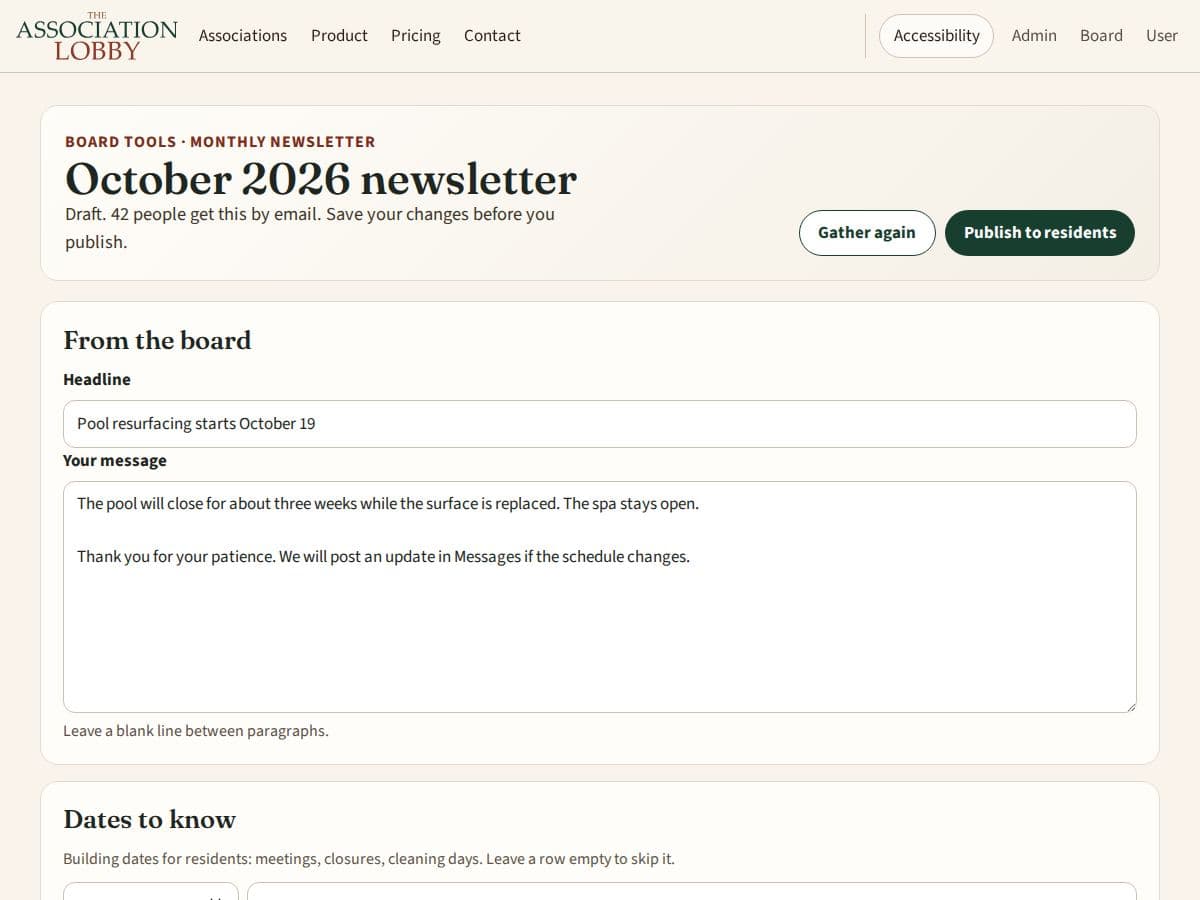
Open Newsletter, then Board: write and publish. A draft is ready for you on the 20th for the next month, and each Tuesday for the coming weekend, with local news, events, places and weather already gathered for the association's city. We email you when it's ready.
Write a short note from the board, add dates to know, and untick any local item you don't want. Press Save draft, look at What residents will see, then press Publish to residents. It appears on the website and goes by email to everyone who signed up.
On the water (boating and surf notes) shows under Weather in This weekend whenever Weather is ticked. There's nothing for the board to turn on. Each reader can hide it or show it again with the settings button (the gear) next to the On the water heading. Each day's note comes from the forecast wind, storms and any small craft or high surf alerts.
Local news and events from the city's feeds (for Boca Raton: myboca.us news, calendar and alerts, the Boca Raton History Museum and Boca Raton magazine) are gathered again every night just after midnight, so the draft is always up to date when you open it. Until you publish, residents see the gathered local news, events and weather on the Newsletter page, marked as gathered automatically, but nothing is emailed. Your note and dates appear only after you publish. Published issues stay exactly as you approved them. Gather again still works any time.
Where we look shows the city website and feeds we found from the association's address. Add a county, library or parks calendar in Settings if you like. Who signed up lists unit, name and the date and time each person signed up; emails are never shown.
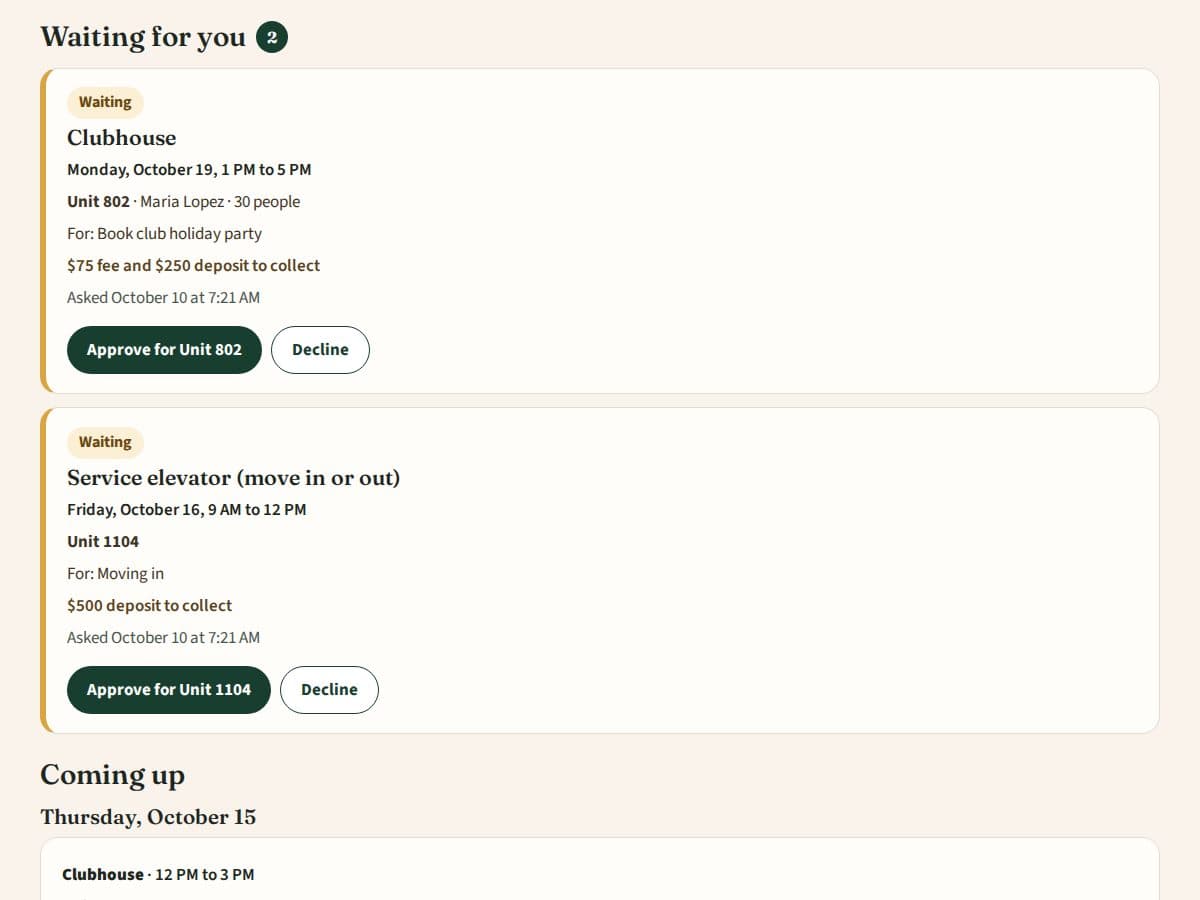
15. Approve reservations and set up spaces
Open Board tools, then Reservation requests. Requests waiting for you are at the top, with the unit, the time, how many people and what it's for. Press Approve, or Decline and write why. The household gets an email either way. Your Today page and My dashboard show how many are waiting.
Coming up lists every approved booking by day. Mark the fee paid and the deposit received or returned as the money comes in. To cancel an approved booking, for example for a repair, press Cancel this booking and write why.
Under Spaces residents can reserve, add the clubhouse or any other space: name, rules, open hours and days, shortest and longest booking, notice, fee, deposit and whether tenants can book. Add closed days for holidays or repairs. Two bookings can never overlap, even if two people send a request at the same moment.
For the east and west elevators, or anything else that needs setting up, fill in Before each booking, staff needs to, for example Put the elevator covers up before the move and take them down after. It shows on each booking, and the board and property managers get an email the day before.
16. Schedule pest control
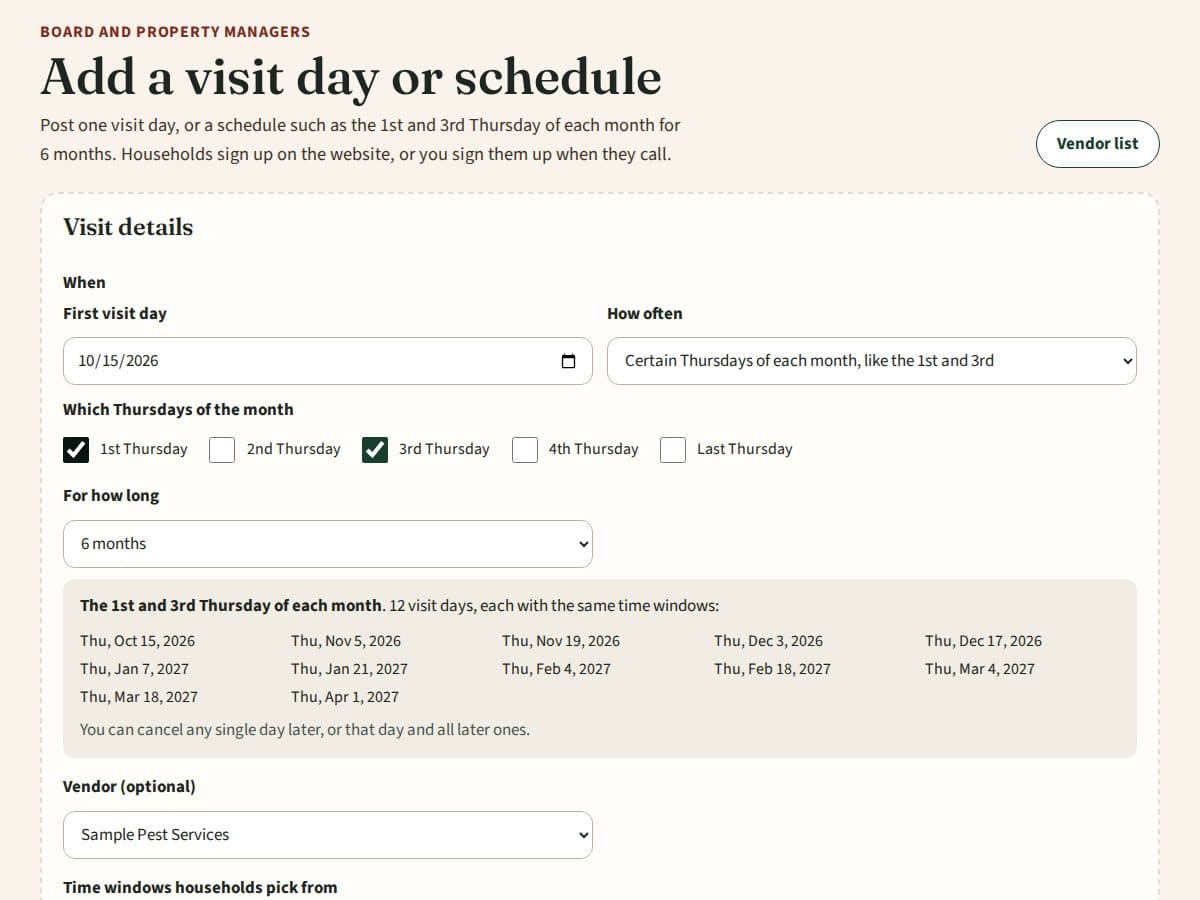
Open Board tools, then Pest control calendar, and press Add a visit day or schedule. On that page, pick the day and the vendor, set the time windows (and how many units fit in each, if there's a limit), and add a note for residents. Leave Email every household ticked to send everyone a link to sign up.
If the company comes on a schedule, pick the first visit day, then choose How often. For example, choose Certain Thursdays of each month and tick 1st and 3rd. Under For how long, pick 3 months, 6 months, 1 year or a date. Every visit day is listed below the form before you save, each with the same time windows. One email tells households the whole schedule.
17. Use the pest control calendar
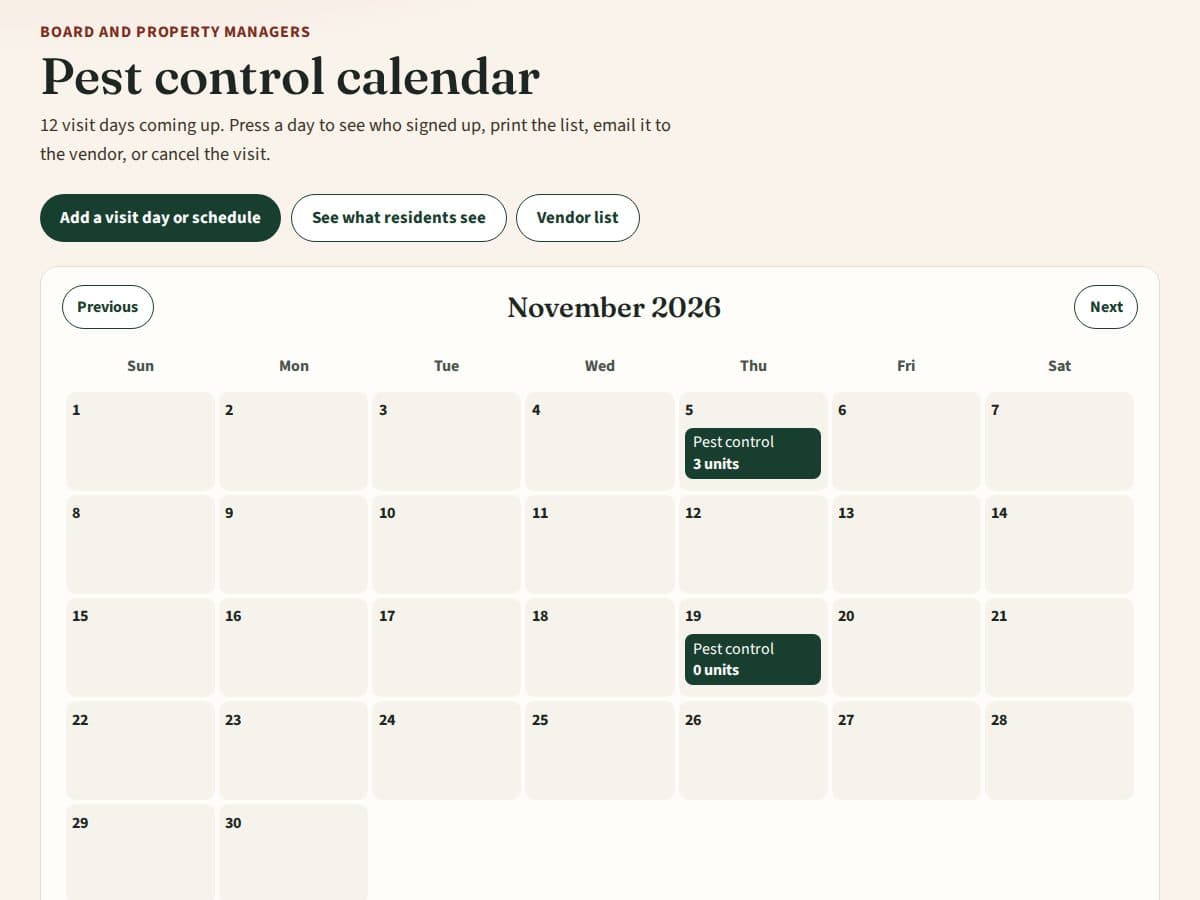
Board tools, then Pest control calendar shows one month at a time. Each visit day shows how many units signed up. Use Previous and Next to change the month. Below the calendar, the same days are listed with the count for each time window.
Press a visit day to open its list. At the bottom of that page, press Cancel this visit and write why; everyone signed up gets an email. For a visit on a schedule, choose to cancel only that day, or that day and every later day.
18. Send the pest control list
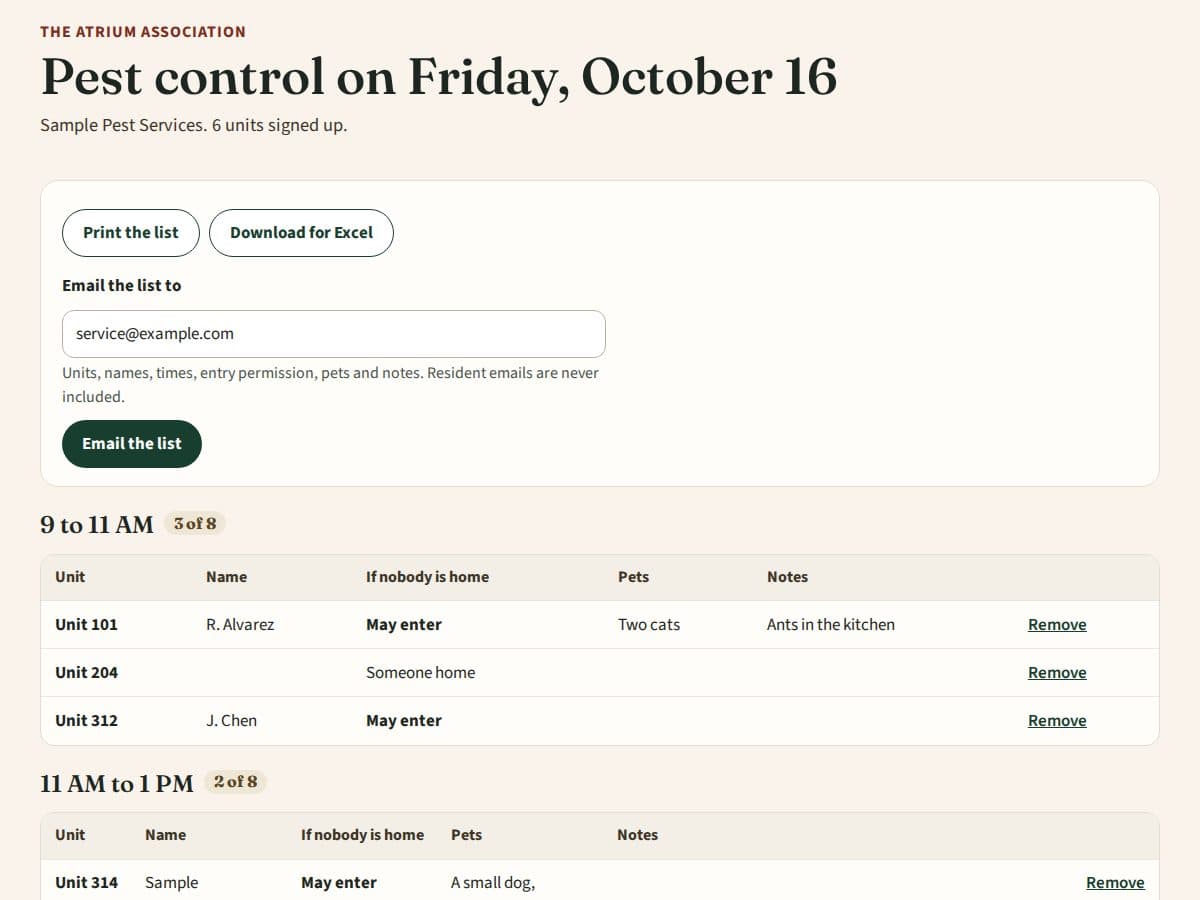
Press a visit day on the calendar to open its list. The list is grouped by time with the unit, the name, whether the technician may come in, pets and notes. Print it, download it for Excel, or email it to the vendor. Resident emails are never on the list.
When someone calls the office, use Sign up a unit for someone. They get an email that you signed them up.
19. Keep the vendor list
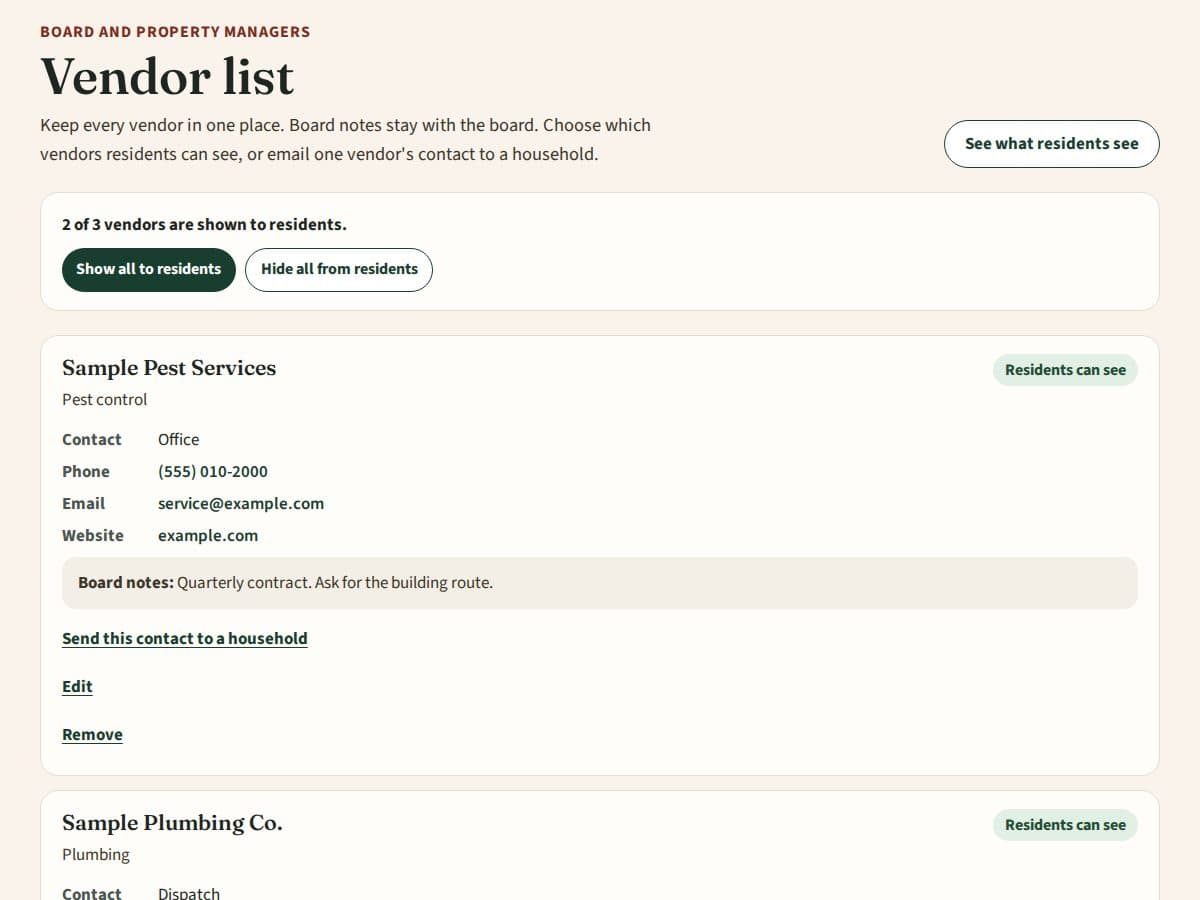
Open Board tools, then Vendor list. Add each company with what they do, the contact person, phone, email, website and board notes. Board notes are never shown to residents.
Tick Show this vendor to residents to put it on the residents' Vendors page, or use Show all to residents and Hide all from residents. Under a vendor, Send this contact to a household emails that vendor's details to one unit.
20. Reminders and the morning brief
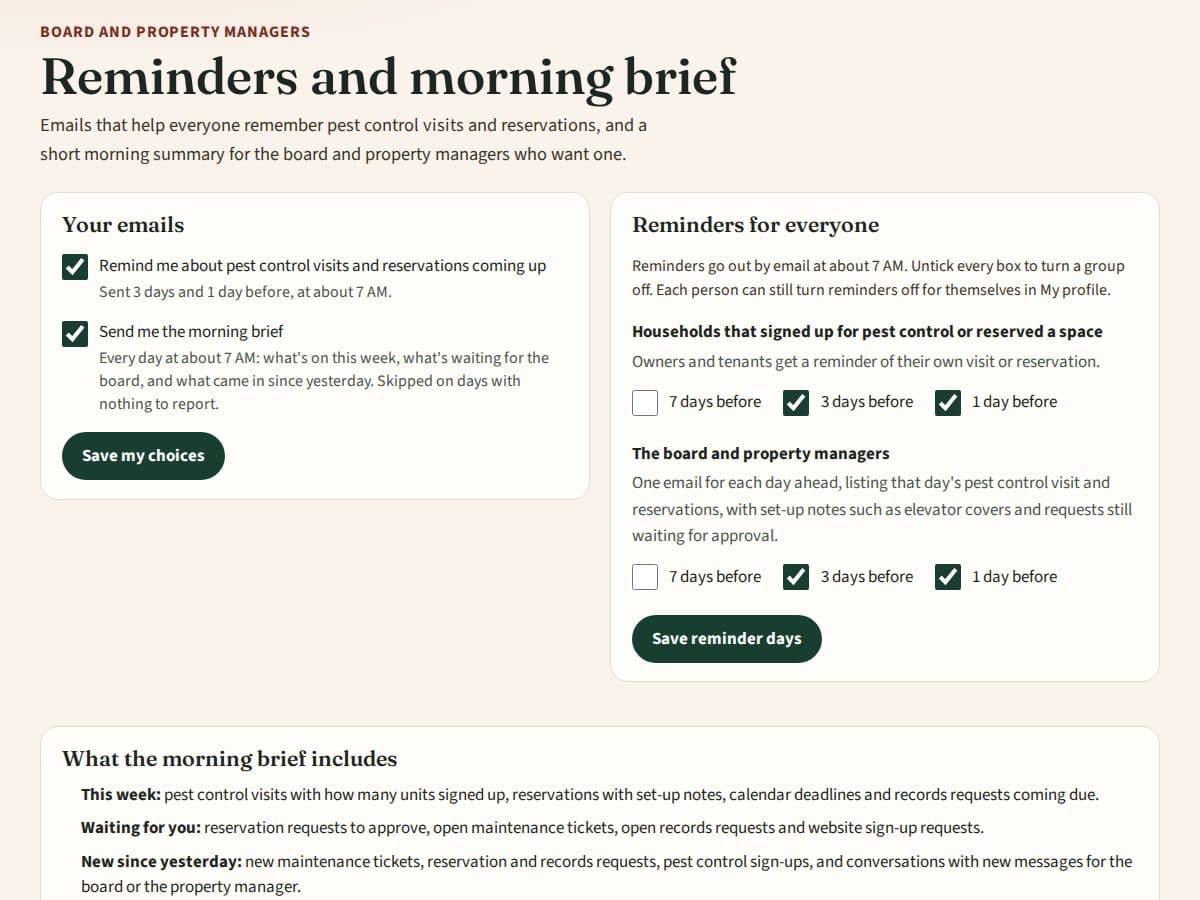
Open Board tools, then Reminders and morning brief. Under Reminders for everyone, tick how many days before households and the board get reminders about pest control visits and reservations: 7, 3 or 1 day before. The usual choice is 3 days and 1 day before. Untick every box to turn a group off.
The board's reminder is one email for each day ahead, listing that day's pest control visit with the sign-up count, the reservations with set-up notes such as the elevator covers, and requests still waiting for approval.
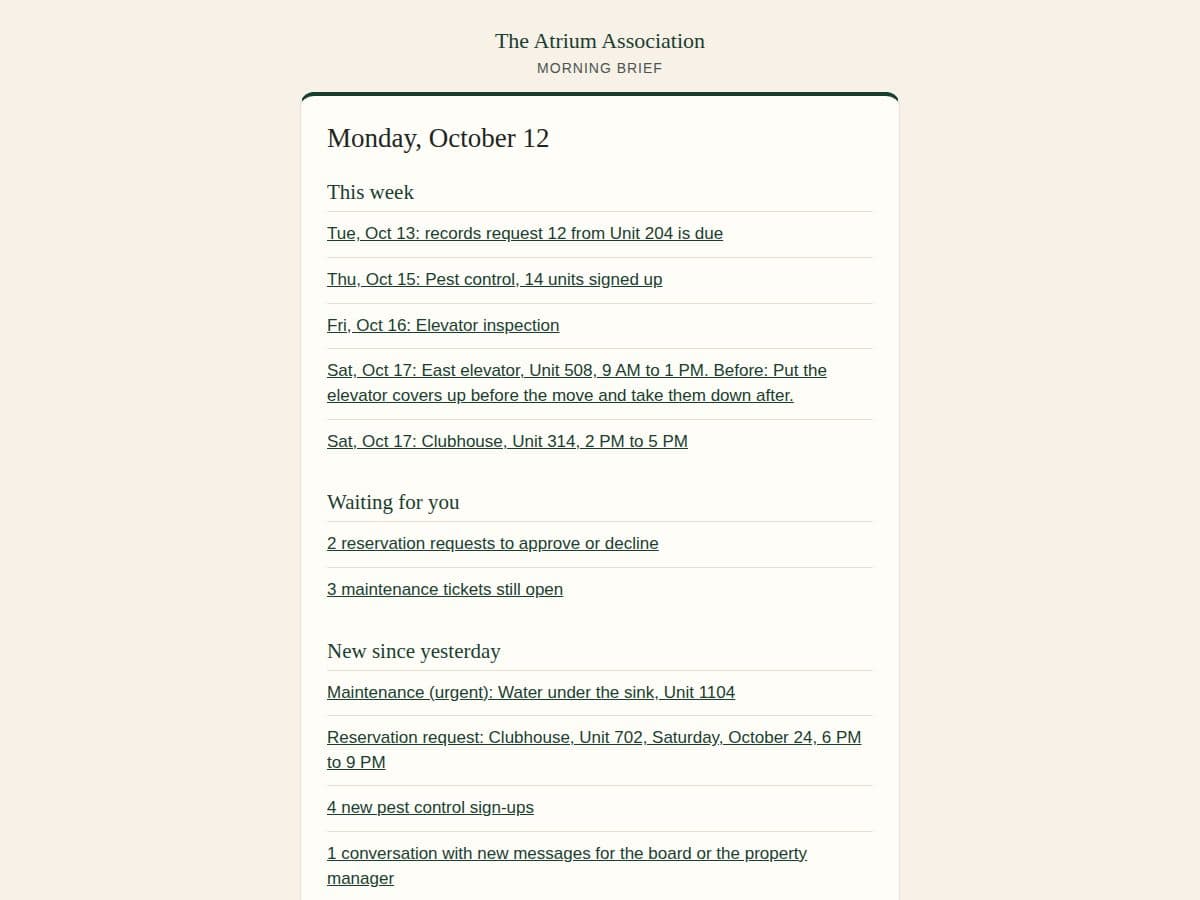
Under Your emails, tick Send me the morning brief to get a short email every day at about 7 AM: what's on this week, what's waiting for the board, and what came in since yesterday. Each person chooses for themselves, and it never includes residents' email addresses.
21. Read the morning brief
The brief has three parts: This week, Waiting for you, and New since yesterday. Each line links to the page where you handle it. On days with nothing to report, no email is sent.
22. See who has signed in
Open Board tools, then Community activity. Only the board and property managers can open it. The top shows how many units and owners have signed in, how many units visited in the last 7 days, and how many haven't signed in yet.
Below, every unit is listed with each person, when they first signed in and when they last visited. Press Not signed in yet or Signed in to show one group. Renters show with (renter) after their name and aren't counted as owners. Press Download spreadsheet for a copy for the board meeting.
To remind owners who haven't signed in, tick Yes, send the invitation now and press Send invitation. It emails the website address and how to sign in. Nothing is ever sent automatically. To avoid too many emails, an association can send one round every 7 days, and each owner gets at most 2 invitations, 30 days apart.
23. See who read a message
In a private conversation, Seen and a time show under your last message once the other side has opened it.
In group spaces such as Community, your message shows Seen by and how many units opened it, for example Seen by 12 of 60 units. Only the board and property managers see this; residents don't.
24. Review approval requests
To let owners send requests online, open the Board desk. Under For unit owners, press On next to Approval requests. Press Off to hide them again; requests already sent are kept. My household has the same switch; it starts on. The board, the property manager and Association Lobby can change these.
When an owner asks to change their unit, the board and property managers get an email, and Today shows how many requests are waiting. Open Board tools, then Approval requests. The oldest request is first, with the date the two weeks run out.
Open a request to read the description and open or download every file at full size. Press Mark as being reviewed so the owner knows someone is on it. Add a note for the board only, or tick the box to send it to the owner.
Choose Approve and add any conditions, or Not approved and give the reason, then press Save the decision and email the owner. The owner gets an email and a notice on My page. Your name and the time are saved with the decision. Press Print for a paper copy for the unit file.
When the owner says the work is finished, the request moves to Work finished, inspection needed. After the final inspection, press Final inspection done.
The owners of the unit also get a notice in their bell when you decide and when you mark the final inspection done.
25. Schedule projects on the project calendar
Open Board tools, then Project calendar, and press Add a project. Give it a name, the start and end days, the hours and where it is, and what owners should know. Pick a status: Planned, Work in progress, Finished, Postponed or Cancelled.
Choose who can see it. Everyone signed in puts it on the calendar for owners and residents. Only the board and property managers keeps it private while it's being planned; it shows on your calendar with a white box.
Nothing is sent to owners on its own. To tell the community, tick Tell the community about this project when I save. Choose Owners or Owners and tenants, tick Also send it by email if you want, and add a message if you like. You're asked to confirm how many people it reaches before it's sent. They get a notice in their bell and on My page.
To change the dates or the status later, open the project and press Change this project or notify the community. Tick the box again to send an update. Notices sent shows each notice: when, to whom, how many by email, and who sent it.
26. Update a design picture and ask for feedback
Open a picture in Design review and press Upload a new version of this picture. Choose the new photo, check the name and say what changed, then press Upload the new version. The new picture goes next to the old one, in the same category and group. The old one keeps its likes and comments.
Owners who commented on the old picture get a notice in their bell: a new picture has been made, and we'd love their feedback. Every other owner gets a notice that there's a new picture in that category. Several new pictures in one category share one notice. No emails are sent.
Publishing a design from the Design studio works the same way: owners who commented on the photos it was made from are asked for their feedback.
27. Answer design suggestions from owners
Open Board tools, then Design suggestions. The number shows how many are new. Each one shows the owner, the unit, the area, their idea and their photo; press the photo to see it full size.
Press Make it in the Design studio to open the studio with the owner's photo and idea filled in. Pick the Design review area first if the owner chose Somewhere else. When you publish the new picture, the owner and everyone who supported the idea are told it's ready and asked for feedback.
Press Share so owners can support it to let other owners press I'd like this too. Press Not now and give a reason to answer the owner without making it. Nothing is emailed.
28. Keep Florida deadlines on the calendar
Open Board tools, then Florida deadlines. Enter your building facts: the certificate of occupancy date, habitable stories, number of units, the month your fiscal year starts, the next annual meeting and budget meeting dates, and when the last milestone inspection, structural reserve study and insurance appraisal were done. Press Save and add the deadlines.
Each deadline from Florida law goes on the yearly calendar with reminder emails to the board and manager: election and meeting notices, the budget, the year-end financial report, the milestone inspection, the structural integrity reserve study and the insurance appraisal. When you mark one done on the calendar, the next one is added.
If your bylaws ask for more notice than the state, press Our bylaws use a different period under that rule and say where it comes from. When the state changes a law or an attorney asks for a change, Association Lobby updates the rule, your open deadlines move, and you get a notice in the bell. Each rule says whether an attorney has reviewed it. This is reference, not legal advice.
29. Use the Red Book in an emergency
The Red Book keeps the building's emergency information in one place: where each shutoff is and how to use it, who to call, and what to do. Only the board, property managers and maintenance staff can open it; owners and renters never see it. Open Board tools, then Red Book (emergency), or use the box at the top of the Board desk, Emergency? Look it up in the Red Book.
In a hurry, type what's happening, such as water leak, power outage or elevator stuck, or press one of the buttons under What's happening. The matching shutoffs come first, then who to call, then the steps. Press Call next to any number to phone it from a cell phone. In a life-threatening emergency, call 911.
To fill it in, press Add a shutoff or system and give it a name, where it is, what it controls, how to get to it and who has the key. Add up to 6 photos; they keep full quality. You can link a vendor and documents such as plans. Under Emergency contacts, add the plumber, the elevator company, the fire alarm monitoring company and the insurance claims line.
Under Emergency procedures, press Add starter procedures to add general steps for a water leak, power outage, elevator entrapment, fire alarm, hurricane and gas smell. Change them to fit the building; they're general safety steps, not legal or professional advice. Press Print for a paper copy to keep at the front desk.
30. Open the budget and load this year's budget
Open Board tools, then Money, then Budget. The board and property managers see all of it. Owners only see a budget the board shares with them. Budget is on unless Association Lobby turns it off for the association or for one person. The property manager, the president or the treasurer sets the budget amounts. Every board member and the property manager can bring in the income statement and sort expenses. The page has six tabs: How we're tracking, This year's budget, Next year's budget, SIRS study, Contracts and invoices, and Files and history. Once a budget is loaded, the page opens on How we're tracking.
On This year's budget, press Upload the budget and choose the budget the board adopted: an Excel file, a CSV file, a PDF (typed or scanned) or photos of the pages, up to 25 MB. AI reads it, uses the column for that year, and checks that the lines add up to the file's own total. Reading a file uses a few of the association's AI credits, and the file is also saved in Documents, Budget files, for the board only.
Check each line against the paper copy, especially after a scan. To fix a line, press Change under its name, correct it and press Save this line. Press Add a line under the table for anything missing, or Change, then Remove this line, to take one out.
Each line has a kind: recurring, insurance, reserve, one-time or other income. Reserves, insurance and one-time costs are left out of the Florida 115% check. Under When it's paid, choose Every month, Once a year (and pick the month), Every quarter, Payment plan, or My own amounts by month.
When it matches, press Use this budget (adopted). The page then shows what owners pay in total and what each unit pays a month, a quarter and a year.
Need more facts about a line? Press Needs more detail? under its name, check This line needs more detail, write what you want to know and press Save. A yellow Needs more detail tag shows on the line, and the top of the page counts them. Only the board and the property manager see these tags. Uncheck it and press Save when it's answered.
To show the budget to owners, the property manager, president or treasurer presses Share with owners under the status. Owners then see Budget in their menu, with each category, line and yearly amount, but not the Needs more detail notes. Press Stop sharing with owners to hide it again.
Owners can press Ask about this under any line of a shared budget and type a question. It comes to the board and the property manager as a private message from their unit in Messages, with the line name, category, year and amount at the top. Answer it there like any message.
31. Enter insurance paid with a down payment and monthly installments
Many associations finance the insurance: a first (down) payment, then monthly installments. On This year's budget, find the insurance line and press Change under its name.
Under When it's paid, choose Payment plan. Enter the Total for the year, including any finance charges; the Down payment and the Down payment month; the Number of installments; and the First installment month.
The page shows the amount for each of the twelve months before you save, such as a down payment in June, then six payments from July. The installments must end by the last month of the fiscal year. Press Save this line.
If the policies are paid on different schedules, add one line for each policy, such as property and windstorm, flood and liability, each with its own payment plan. If the payments don't follow a pattern, choose My own amounts by month and type each month's amount.
How we're tracking then compares each month's insurance payment with that month's plan, not one twelfth of the year. Next year's budget keeps the same plan, scaled to the new amount.
32. Keep track of reserves and check them against the SIRS study
Every reserve line is kept, even when no contribution is budgeted this year, such as items marked NON SIRS or IN SIRS. The Reserves table on This year's budget lists each one with its type (SIRS or non-SIRS), this year's contribution, the balance, the replacement cost and the year of replacement.
When the budget file has a reserve schedule, AI copies those numbers in. To change them, press Change under the reserve's name. Under Reserve tracking, choose the Reserve type and enter the Balance, Balance as of, Replacement cost and Year of replacement, then press Save this line. Enter 0 as the amount for the year if no contribution is budgeted.
The balances come from the file or the reserve study. They don't change on their own when payments come in yet.
To check the budget against the structural integrity reserve study (SIRS), open the SIRS study tab and press Upload the SIRS study. Any board member or the property manager can do this. Choose the study as a PDF (typed or scanned), Excel or CSV, up to 25 MB. AI reads its date, who prepared and inspected it, the funding method, each item (roof, structure, fireproofing and fire protection, plumbing, electrical, waterproofing and exterior painting, windows and exterior doors, and other required items) and the funding plan. A long study can take two or three minutes and uses some of the association's AI credits. The file is also saved in Documents, Budget files, for the board only.
The top of the tab says whether this year's budget puts enough into SIRS reserves: what the study calls for this year, what the budget's reserve lines marked SIRS add up to, and the difference, marked Funded or Short. It also lists any required item the study doesn't cover. Florida law says SIRS reserves must be funded as the most recent study says and can't be waived; after a milestone inspection, the board may pause them for up to two budget years to pay for the repairs. Check with the association's attorney or accountant.
Each item in the study is tied to a reserve line in the budget: the one with the same name, else one named for the same thing (a roof item goes to Reserves - Roofs), else the budget's SIRS reserve line. Many studies, like The Atrium's, pool the required items into one account, so most items go to the one SIRS reserve line. If an item is on the wrong line, or in the wrong group, press Change under its name, choose the reserve line and the group, then press Save. When several items share one line, the line is compared with all of them together.
The study's items aren't new budget lines: they are paid from the reserve lines already in the budget. On This year's budget, under each reserve line in the budget table, From the SIRS study lists the items that line pays for; they are part of the line's amount, not added to it. The Reserves table further down also lists the study's items under the reserve line each one is tied to, with its replacement cost, years left and the yearly amount from the study. Below the table it says how many items the study lists and what its funding plan calls for this year.
The study shows when the next one is due, 10 years after its date. A new study is needed sooner after major repairs, such as milestone repairs, that change an item's remaining life or cost. When it arrives, press Upload a newer SIRS study. The newest study is the one used; the earlier one stays under Files and history.
Below that, What the study means for this year's budget lists what the board should look at, each marked Good, Check or Note: whether the budget puts in what the study's plan asks; the work the study expects this year (for example, exterior painting) and how much is left in the account at year end; any year in the next five when the plan runs out; what next year's plan calls for; whether the balances in the budget match the study's balance; any reserve line whose replacement cost or year differs from the study's items; routine maintenance the study pays from SIRS that the budget also has as an operating line, so it isn't paid twice; required groups the study leaves out; and whether the study's items add up to its plan, which would mean it was read wrong. The Reserves card on This year's budget says how many checks there are.
When AI sorts an income statement, it also uses the study and these checks, so spending and contributions for a SIRS item go on that item's SIRS reserve line, never on a non-SIRS line. Routine maintenance the study funds is left for the board to decide when the budget also has an operating line for it, and work the study expects this year is put on its reserve line.
If the budget is short of the study, the shortfall card says how much, how much special assessments, loans and lines of credit for SIRS cover, and what is still short. To add one, open Add one the owners approved under Special assessments, loans and lines of credit, choose the kind, enter the amount, the date and the vote, and press Save. Florida law lets SIRS be paid by regular assessments, special assessments, loans or lines of credit; the last three need a majority of all the owners' votes. When a milestone inspection was done in the last 2 calendar years, the card says the pause may apply: with a majority of all the owners' votes, SIRS payments can be paused or lowered for up to 2 budgets in a row, only for budgets adopted by December 31, 2028, and a new SIRS is needed before payments start again. Save the inspection date in Florida deadlines, building facts.
SIRS and milestone spending shows what was paid from SIRS reserves, from special assessments and loans, and for milestone work this year, and what was spent on each study item. Payments are labeled on their own: from the vendor's contract, from the AI when it sorts, from the budget line (a reserve line marked SIRS means SIRS reserves), or from words like milestone, structural engineer or concrete restoration. To change one, press Change what it was for, choose the contract, study item and how it was paid, check Milestone inspection work if it is, and press Save. The rules never change a choice a person made.
33. Bring in the income statement and see how we're tracking
Spending isn't typed in one at a time. Each month, open How we're tracking, go to Bring in what was spent and press Upload the income statement. Choose the income statement (profit and loss) from QuickBooks or the management company, as Excel, CSV or PDF, up to 25 MB. It can show each month in its own column or one total for the months it covers.
The statement's months are read from the top of the file. If it doesn't say, open The statement doesn't say which months it covers? and choose the First month and Last month before you upload. A newer statement for the same months replaces the older one, and the sorting you did is kept.
Each expense account is matched to its budget line: first with the choices the board made before, then by name, then with AI. When AI is sure, it puts the account on the line and lists it under Sorted by AI: check these. Press Looks right to keep it, or choose another line. AI only sees this association's budget line names and the account names from its own file, not the amounts or anything from another association, and it goes only to AI companies whose terms rule out training on it. It uses a few of the association's AI credits.
Anything with no budget line is listed under Not in the budget, often with AI suggests and the line it thinks fits. For each one, press Use it to take the suggestion, or Choose a budget line and press Save. To add it to the budget, press Add it to the budget, choose the category or A new category..., type the line name and press Add to the budget. The property manager, president or treasurer can also give it a yearly amount. The choice is remembered, so next month's statement puts that account in the same place. Choose Leave it out for transfers, refunds and anything that isn't a budget expense.
Some budget lines may get nothing from the statement, because the statement calls them something else or adds them into a bigger account. They're listed under Budget lines not found on the statement. Press Open the statement to look at it. For each line, choose the account under Where is it on the statement?, then press It's this account (the money now counts for that line, every month, and next month too) or It's part of this account (just a note; no money moves). Press It's not on this statement if it isn't there. Don't know? Press I don't know. Ask the property manager, add a note if you like, and press Send to the property manager. They get a message with the line, the statement and a link to it, and their answer comes back in Messages. When the property manager asks, it goes to the board. Answers are under Already answered, where Undo puts a line back on the list.
Every income statement is saved, for the board and property managers only. Under Files brought in, press Open next to a statement to see it. A statement that was replaced by a newer one, or removed, stays saved under Earlier statements, saved for comparing, with its totals and how much the current statement for the same months differs. Press Open to compare.
Put something in the wrong place? Open Move something you already sorted, find it and choose the right line, or press Move back to Not in the budget. Every month of that account moves together, and later statements put it in the new place.
The top of the page says how much was spent against the budget so far, whether that's over, under or on track, and where the year ends at this pace. The bar shows how much of the year's budget is spent, and the line shows where it should be by now. Below, each category has a card marked Over, Under or On track; press See the lines for each line. The full table, month by month, is at the bottom. Use Show through to pick the month.
For months with no income statement yet, the property manager, president or treasurer can press Upload payments under Bank payments and choose the bank export (CSV) or a payments report. When a statement covers those months, those bank payments are set aside so nothing is counted twice. Files brought in lists each upload; press Remove next to one that was wrong (step 34).
34. Budget settings, unit shares, a new file and removing a wrong file
At the bottom of This year's budget, the Settings box has Fiscal year starts in, Expected yearly increase (%), Point out lines over by (%) and Notes for the board. Press Save settings after a change.
Under What each unit pays, press Add each unit's share and type one unit per line: the unit number, a comma, then its share from the declaration, and press Save shares. Until then, every unit pays the same.
To load a corrected budget, or the same file again, open Replace with a new file in the Settings box and press Upload a new budget file. All the lines are replaced by the new file's lines, so changes made by hand, such as a payment plan, need to be made again. Payments already sorted stay on lines with the same name.
If an upload doesn't go through on a phone, save the file to the phone first (for example to Downloads) and choose it from there, or upload it from a computer. If it still fails, send a screenshot of the message to office@associationlobby.com.
If a budget, income statement, payments file or SIRS study was the wrong file or was uploaded twice, open the Files and history tab and press Remove next to it. Choose why (Wrong file, Uploaded twice, Wrong year or months, Replaced by a corrected file, or Something else and type the reason) and press Remove it. Any board member or the property manager can remove an income statement or a SIRS study; the property manager, president or treasurer can remove a budget or a payments file. Each Remove button says what happens first.
Removing a file backs it out without changing anything else. A budget goes back to how it was before that file: if it replaced an earlier budget file, the earlier lines, amounts, payment plans and reserve numbers come back, and payments stay on any line both files have. Payments on a line only the wrong file had wait under Not in the budget, and go back on their own when the right budget, with that line, is uploaded. If there was no earlier file, the lines are removed but the year's settings stay. Removing an income statement stops its amounts counting; if it replaced an earlier statement for the same months, that statement counts again with the choices made on it, including anything left out. Lines added to the budget while sorting the wrong statement are removed if nothing else is on them and no amount is budgeted. Removing a payments file keeps any payment that another uploaded file also has. Removing a SIRS study goes back to the study before it.
Signed vendor contracts go on the Contracts and invoices tab. Any board member or the property manager presses Upload a signed contract and chooses a PDF, photo or Word file saved as PDF, up to 25 MB. AI reads the vendor, the other names it uses on bills, the price and how often, the start and end dates, whether it renews on its own, the price increase, the budget line, the SIRS item, and points like notice to cancel. Press Check the details to fix anything, then press Save, these are right. The file is saved in Documents, Budget files, for the board only.
Each contract card shows what was paid this year, what was billed with unpaid invoices, what the contract allows so far, and Over by or Under by. It warns when the contract costs more than its budget line, when it ends or renews on its own soon, when the price goes up, and when a person hasn't checked what AI read. Every bank payment, statement line and invoice from that vendor is matched to its contract on its own, from the vendor's name or one of its other names. Vendors paid $2,500 or more with no contract on file are listed so their contracts can be added.
Press Upload an invoice for a bill. AI reads the vendor, invoice number, date and amount, finds the contract and budget line, and says whether it is within the contract. It waits under Invoices not paid yet and isn't counted in the budget until it is paid: choose the Paid on date and press Mark paid, or it is marked paid on its own when a bank payment from that vendor for the same amount comes in. The same invoice number can't be added twice.
Ask the helper about spending, such as How much have we spent on landscaping to date? or What did we pay the pool company up until June 30? It adds up the association's posted payments for those dates by budget line, vendor and contract, and links to the budget. Only the board and property managers get spending answers.
Nothing is erased from the record. The History list keeps every upload, replacement and removal with the date and time (Eastern), the person and their role, the file and the reason, and it can't be changed or deleted. The file stays in Documents, Budget files, with Removed in front of its name. The same file can't be uploaded twice; the message says when and by whom it was uploaded.
35. Plan next year's budget
Open the Next year's budget tab and press the Start button with next year's number, such as Start the 2027 budget. Each line gets a suggested amount and the reason, from this year's pace plus the expected increase. Reserves stay at this year's amount until you enter the reserve study's number, and one-time costs are left out. Change any line.
The page shows the change from this year in dollars and percent, the change for each unit a month, a quarter and a year, and the Florida 115% check. Budget dates shows when the notice and proposed budget must go out, 14 days before the budget meeting; add the meeting date in Florida deadlines, building facts.
Press Print or save as PDF for the board packet, or Download for Excel. When the board adopts it, press Use this budget (adopted). It's a guide, not legal or accounting advice, and nothing is sent to owners.
36. Maintenance fees: who paid, grace period and reminders
Open All settings, then Maintenance fees under Money. On Settings, choose every month or every 3 months, the due day, the first due date and the grace period, such as 10 days. A late fee is added only if you enter one and your declaration allows it; in Florida it's kept to $25 or 5% of the late payment, whichever is more. Each unit's fee comes from the adopted budget and its share.
Reminder emails are off until you check Send reminder emails. Choose the days after the due date, such as 2, 5 and 7. Only units that still owe get one, and each goes out once.
Press Link the association's Stripe account so owners can pay online. The money goes to the association's own Stripe account and bank. It's in test mode for now, so no real money moves.
Who has paid shows every unit as Paid, In grace period or Late, with what it owes, days late and the last payment. Press Open on a unit to see its charges and payments, record a check, or waive a charge with a reason. Record a check is for money paid in person. Payments go to interest, late fees, costs, then the fee, oldest first, as Florida law says.
37. Add board offices such as Vice President or Director 1
Anyone on the board can do this, and so can the property manager. Open Board tools, then Board and staff roles, and scroll to Other offices.
For directors, choose how many under How many director offices? (for example 5) and press Add Director offices. That adds Director 1 to Director 5. For any other office, type its name, for example Vice President or VP, and press Add office.
Then find each person in the list at the top, check the office they hold, and press Save board offices. The board can also name the secretary and treasurer. An owner or Association Lobby names the president.
Whoever holds an office gets the board's tools the next time they sign in with the email on their unit. No email is sent. Recent changes at the bottom shows every change and who made it. To take an office away, uncheck the person and save, or press Remove beside the office.
38. Bill pay: choose it, approve bills, or turn it off
Bill pay is a service your association chooses. With it, vendor bills go to Life Passion Works (LPW), which reads and checks each one. The board approves it here, and LPW pays the vendor on time.
To choose it, the president or the board admin opens All settings, then Bill pay service under Money, and presses Select Bill pay. Association Lobby then sets it up with LPW. Billing starts the day it's turned on, not before. Changed your mind first? Press Withdraw the request.
Once it's on, Bill pay appears in the menu for the board and the property manager. Bills waiting for the board are at the top, with the vendor, amount and due date. The president, vice president, treasurer or secretary presses Approve, or Reject and says why. Each person decides once. One rejection stops a bill.
LPW's AI checks every invoice for the vendor, amount, due date, duplicates and bank details. LPW's team reviews new vendors, bank changes and anything unusual. If a vendor changes their bank account, a red warning shows at the top and LPW holds payments to them until the change is checked. Call the vendor at a number you already have.
To turn it off, open Bill pay service and press Turn off Bill pay. Tick the box and confirm. It stays on to the end of the billing cycle you're in, which renews each month on the day it started, and then turns off by itself. Bills the board already approved are still paid. Until that date you can press Keep Bill pay on.
To see how spending is going, press See spending, burn rate and budget at the top of the Bill pay page. Choose Week, Month, This budget year, Last 12 months or Last 24 months. For a week or month, press Earlier or Later to move through time.
The top shows what was paid, the burn rate (the average paid each month), bills approved but not paid yet, and bills waiting for the board. The chart shows what was paid in each week or month, with a dashed line for the budget of the same lines. Press Show these numbers as a table to read the numbers instead.
Compared with the budget lists each budget line Bill pay paid toward, with the budget so far, what was paid, and how much over or under. For the budget year it also says where those lines end the year at this pace. If a vendor isn't matched to a budget line yet, the president, treasurer or property manager chooses the line once and presses Save; the Budget page remembers it too.
By vendor shows who was paid the most. Bills in this period lists each bill; press Download as a spreadsheet (CSV) for the full list.
Each association sees only its own bills, vendors and payments. LPW doesn't email the board; you see everything here.
39. Turn photo categories on or off, or delete one
Photo categories are the places on the dashboard, such as Lobbies, Pool Area or Unit Doors. Open All settings, then Photo categories under Our website. The president, the board admin and the property manager can change them.
Each category has an On and Off switch. Turn one off to hide it, and every photo in it, from owners, residents and visitors. The photos are kept, with their votes and comments, and come back when you turn the category on again. On the settings page an off category shows in gray.
To remove a category for good, press the red Delete category button. If it still has photos, you're told how many will be deleted with it. Tick the box to confirm, then press Delete category and photos. This deletes the photos, their votes and comments, and the original files, and it can't be undone. To keep the photos, turn the category off instead.
To add a category, type its name under New category and press Add category.
You can also ask the assistant, for example: Turn off the lobby category, or Turn on the pool category. It shows a button such as Turn off Lobby; nothing changes until you press it. It only knows your association's own categories.
40. Find any setting on All settings
Open All settings from the menu, under People and settings. Settings are in six numbered groups: People, Our website, Records, Keeping in touch, Money, and Helpers and AI. You only see the groups and features you can use.
To go straight to something, type a word or two in the Find box at the top, such as add a resident or pool rules, and press Find. Matching settings show first, then steps from this guide. Press Clear and show all settings to go back.
Most used has three big buttons: Add a resident, Upload a document, and Write a page or notice. Sign-in requests shows how many people are waiting.
The line near the top says how many features are on. Press What's included to see each feature and whether it's On, Off or Coming soon. To add one, ask Association Lobby.
Every settings page starts with Home › All settings at the top. Press All settings there to come back, or Home to go to your association's website.
41. Send a message to every unit owner
Messages from the board is included at no extra charge. When it's on, the board and the property manager can send one message to every unit owner. To check, open All settings, then What's included.
Open the assistant and say or type: Prepare a message to the community. It asks if you'd like to type your message or speak it. Press Type it and type what the message should say, or press Speak it, talk, and press Stop. Then press Write it.
The assistant writes the message for you in plain words. It keeps the dates, times, places and amounts you gave and doesn't add any. To change it, edit the subject and message right there, or ask the assistant, for example: Make it shorter, or Add that the pool reopens Friday.
If you're both on the board and the property manager, choose who it's from. Press Send to every owner. It asks once more, with the number of units. Press Yes, send it now, or Go back and change it. A message can't be unsent.
Each unit with an owner on the resident list gets it in Messages, in its conversation with the board or the property manager, with a red number. Owners also get a notice in their bell. No email is sent. Tenants don't get a bell notice, but people signed in for the unit can read the conversation. Owners can reply there.
Up to 5 messages to every owner or to some units can be sent each day. The assistant only works for your association and can't reach any other association.
42. Send a message without the assistant
Open Messages and press Send a message to the community, some units, the board or the property manager. You can also find Send a message in All settings.
1. Who gets it? Choose Everyone in the community, Some units, Just the board, or Just the property manager. Everyone in the community and Some units need Messages from the board turned on. Just the board and Just the property manager only need the Message board.
For the community or some units, choose Unit owners only, or Owners and tenants. For Some units, type in Find a unit to narrow the list, for example 3 for the 300s, then tick the units, or press Choose all shown. If you're both on the board and the property manager, choose who it's from.
2. Write the message: a subject and the message. To talk instead of typing, press Speak instead of typing, talk, and press Stop. Check the words it wrote down.
3. Press Check the message. It shows exactly who gets it and what it says. Press Send now, or Go back and change it. A message can't be unsent.
Board members and property managers get the bell too, even without a unit: it shows New message from Unit 314, New in Board, or New message from The property manager, with the start of the message. Press one to open it.
The community and some units get it in Messages with a red number and a notice in their bell; no email is sent. Just the board posts it in the Board space, which only the board and property managers see. Just the property manager puts it in the board's private conversation with the property manager, who gets the usual email if they chose email for messages.
43. Write About the building for visitors
Visitors who aren't signed in see About the building on your home page. It helps people thinking of buying or renting learn about the building.
The president, other board members and the property manager can all edit it. Open the menu, then More, then Design, and press About the building. Or open All settings, then Our website, then About the building. Start with the Welcome line, one short sentence that shows under the association's name at the top of the home page, such as where the building is and what's close by. Then write an introduction and fill in building facts (one per line, such as Built: 1970), amenities, what's nearby, buying here, renting here, questions and answers, and how to reach the association.
Press Save to keep a draft. Nothing shows to visitors until you tick Show on the public home page and press Save. Once it shows, search engines such as Google can list your home page.
Check every fact before you publish. Leave out anything you're not sure of, such as pet rules.
The section opens with your introduction beside the main photo from the top of the home page, then three cards: At a glance (the building facts), Amenities and Nearby. Each amenity and nearby place gets a matching icon picked from the words you type, such as a pool, an elevator, the beach or shops and dining, so name them plainly. Buying here and Renting here follow, each with a button: See homes for sale or rent when the association lists homes, otherwise Learn more, which opens the questions and answers.
To fill in Nearby from the address, press Find nearby places from the address under Nearby. It looks up public maps (this can take up to a minute), lets the association's AI choose up to six places worth listing, and puts them in the box with about how far each one is. Nothing is saved until you press Save, so check the places and distances first. It uses a little AI credit; if the association has none, it lists the nearest place of each kind instead.
The Welcome line shows once About the building is published, both to visitors and to signed-in owners. If you leave it blank, a general welcome shows instead.
Signed-in owners never see this section. They see What's happening: a welcome banner and tiles for your votes, projects, newsletter and neighbors' posts. Board members and the property manager also see an Edit About the building link there.
For property managers
You have the board's tools, plus offices and maintenance. Press Staff sign-in at the top of the association's site and use the email the association added for you. If you never set a password, press Forgot password, or never set one?, or use Email me a link.
1. Start on Today
After you sign in, you land on Today (the board desk), your dashboard for the association. It shows open maintenance tickets and which are urgent, unread messages, open records requests with their due dates, reservation requests and approval requests waiting for a decision, and sign-in requests waiting for approval.
Press any card or line to open it. You can come back any time from Board tools, then Board desk.
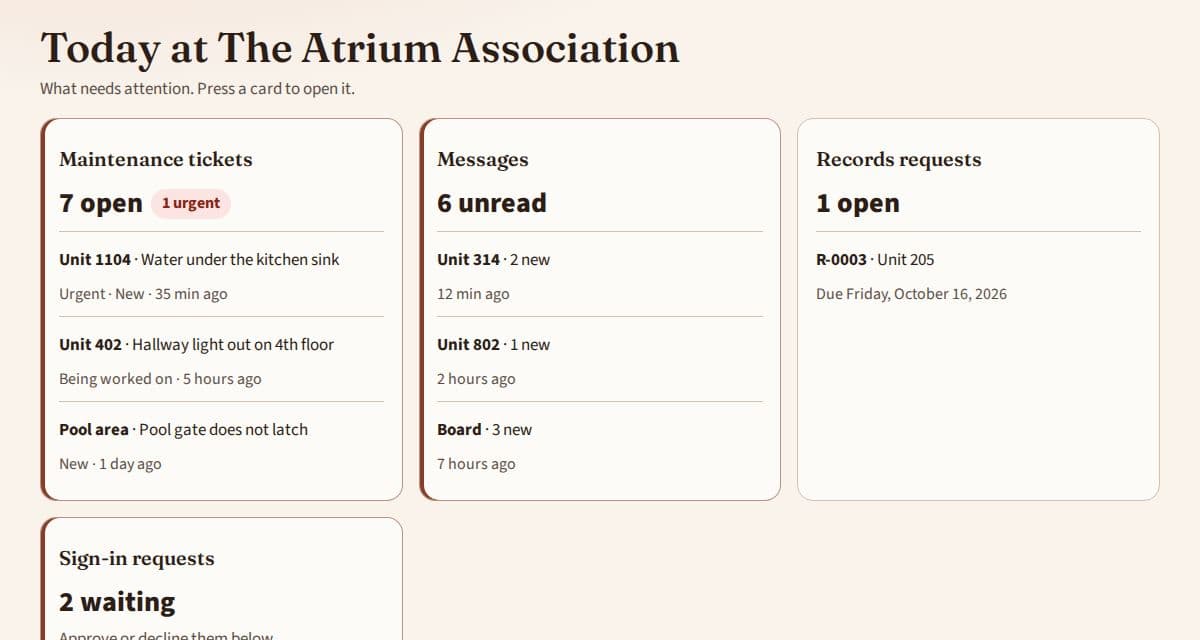
2. Answer messages
Residents can write to the property manager directly. Those conversations are private to property managers. Messages to the board come to you as well. Unread conversations show on Today and in Messages.
3. Handle maintenance tickets
Open Board tools, then Maintenance queue. The top shows how many are new, being worked on, urgent, waiting 7 days or more, not assigned, and done this month. Press any of those boxes to open a list page with just those requests.
The list page shows the requests in a table with the unit, place, date sent, how long it has waited and who it is assigned to. Use the tabs (All open, New, Being worked on, Done, Everything), Show only, and search to narrow it. Press a row to open it right under itself, then assign it, start work, add a note or mark it done. Press Back to the maintenance dashboard to return.
At the bottom, Last 6 months compares requests sent and done each month, Open requests by place shows where problems are, and All reports by kind sorts every report into kinds such as Water and plumbing, Electrical and lights or Doors, locks and access. Press a kind to see its past reports.
Past reports stay in the log. Press Done or Everything, then search by unit, problem, what was done or who did it, or choose a Kind of problem. Each done request shows who marked it done and when, for example Done by Ana Ruiz, Property manager, Oct 24, 8:38 AM. Open it to see the full history.
You can also ask the assistant, for example "Who marked the water leak done?" or "What has been reported in unit 314?". It looks up this association's reports only.
Press Start work when someone is on it, and Mark done when it is fixed. The resident sees each step.
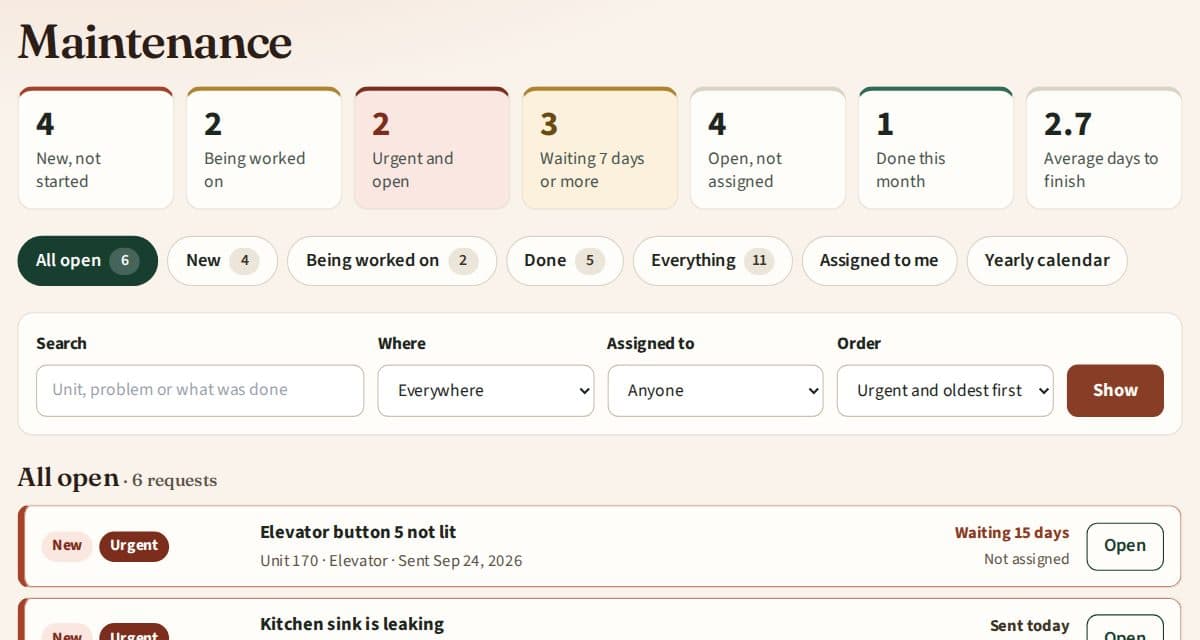
4. Set up board and staff roles
Open Board tools, then Board and staff roles. Check who holds each board office and press Save board offices. Under Other offices, press Add Director offices to add Director 1 to Director 5 in one step, or type an office such as Vice President and press Add office. The board can do this too; an owner or Association Lobby names the president.
Add maintenance staff by email further down the same page. Staff don't have to be on the resident list.
5. Answer records requests
Property managers answer official records requests the same way the board does: Board tools, then Records requests. Watch the due date, release the documents or explain what is withheld, and every step is saved with your name and the time.
6. Everything the board does
You can also use the dashboard, Votes and feedback, documents, records requests, approval requests, the resident list, online voting with vote categories and the annual board election, as described in the board section. Add your photo and work email on My profile so you appear on the Board and staff page.
7. See who has signed in
Open Board tools, then Community activity, to see which units and owners have signed in and when people last visited, and to send an invitation to the owners who haven't. It works the same as in the board section, step 22. Invitations are never sent automatically.
8. Get ready to set up a new association
Before a new association goes live, use the setup checklist. It lists everything needed, such as the owner list, board officers, governing documents, building facts for Florida deadlines, amenities and voting decisions. Each item says who usually provides it and how to send it: send the file, write the answer, decide together, or do it together at go-live.
For an association that's about to join, download the getting-ready packet (PDF) and give it to the board. It lists everything they gather and send you, with boxes to tick and fill in, and what happens next.
Once the association is on Association Lobby, open Board tools, then Setup checklist on its website. Type answers right on the item, and press Upload files to add documents. Files keep full quality and go to Documents, Setup files, for the board and managers only, until you move or share them. Many items have a link straight to the page where that part is done, such as Import the owner list or Add vendors.
Ticks, answers and files are saved for the association, so the board and every property manager see the same list, with who ticked each item. The owner console shows how far along each association is.
9. Florida deadlines, projects and design suggestions
Florida deadlines: open Board tools, then Florida deadlines, and enter the building facts. Deadlines from Florida law go on the yearly calendar with reminder emails, as described in step 28 of the board section.
Project calendar: add work such as roof repairs or painting so owners know what's coming. Nothing is sent to owners unless you choose to tell them.
Design suggestions: owners can suggest a spot for a new design picture. Answer them under Board tools, then Design suggestions.
10. Fill in the Red Book
Open Board tools, then Red Book (emergency). Add the shutoffs and building systems with photos, the emergency contacts and the procedures, as described in step 29 of the board section. The board, property managers and maintenance staff see the same Red Book, and it's ready for whoever is on call.
A good first afternoon: walk the building with your phone, and add the main water shutoffs, the electrical room, the fire alarm panel, the elevator machine room and the generator, with a photo of each.
11. Load the budget and the monthly payments
Open Board tools, then Money, then Budget. Upload the adopted budget as an Excel file, a CSV file, a PDF (typed or scanned) or photos of the pages, check each line's kind and when it's paid, and press Use this budget (adopted). Add each unit's share from the declaration under What each unit pays. Steps 30 to 35 of the board section have the details.
For insurance with a down payment and monthly installments, press Change under the insurance line, choose When it's paid, Payment plan, and enter the total, the down payment and its month, the number of installments and the first installment month (board step 31).
Each month, open How we're tracking and press Upload the income statement. Sort anything under Not in the budget into a budget line, or add it to the budget under a category or a new one; next month's statement sorts itself. If a budget line isn't found on the statement, choose its account or press Ask the property manager. Every statement is saved; press Open to see it or compare it with an earlier one. Transfers to reserves and refunds can be left out (board step 33). Upload the association's SIRS study on the SIRS study tab so the budget's SIRS reserves are checked against it (board step 32). A wrong or repeated file is removed under Files and history, with the reason recorded (board step 34). Before the budget meeting, open Next year's budget and press the Start button for next year's budget, such as Start the 2027 budget (board step 35).
12. Set up maintenance fees and online payments
Open All settings, then Maintenance fees. On Settings, set how often fees are due, the due day, the grace period, any late fee the declaration allows, and reminder emails (off until you check the box). Press Link the association's Stripe account to set up the association's own Stripe account; owners' payments go there and on to its bank.
Who has paid shows every unit's status. Online payments post to each unit on their own; record checks and cash under Record a check. Connecting the bank through Plaid is still coming soon.
13. Vendor bill pay with Life Passion Works
Bill pay is a service the board chooses in All settings, under Money. Once it's on, Bill pay appears in your menu and you see every bill and where it is. The board approves bills; you can follow them. Uploading invoices from this site is coming soon; until then vendors send invoices to LPW.
You'll see each bill's status, the planned pay date, payment history and the vendor list with W-9 and bank verification status. Paid invoices are filed in the association's Documents automatically. If you manage several associations, you'll see only the ones assigned to you, each kept separate.
To start bill pay for an association, first get the board's agreement. Then email partners@lifepassionwork.com with the subject New partner request: and the association's name, and include the details listed in Management companies, step 6. LPW sets up the association's own account and replies when it's ready. Association Lobby then turns bill pay on, and the board chooses its approvers.
A bill's status on the Bill pay page is one of: Submitted, Needs info (LPW is waiting on the vendor or a reviewer), Awaiting approval, Approved, Scheduled, Paid, Overdue, Rejected (by the board), Cancelled or Failed.
14. Turn photo categories on or off
Open Categories from the menu, or All settings and then Photo categories, to add a category, turn one on or off, or delete one, just as the board does. Off hides the category and its photos but keeps them. Delete category removes the category and its photos for good, after you confirm. See the board section, step 39.
You can also tell the assistant: Turn off the lobby category. It shows a button to confirm.
15. Messages from the board: turn it on, and send a message to every owner
Messages from the board is included at no extra charge. When you set up a new association, decide with the board whether to use it: open Board tools, then Setup checklist. The Messages from the board card at the top shows On or Off and a Turn on or Turn off button. The same card is in All settings, What's included. Turning it on also turns on the Message board.
To write it yourself instead, open Messages and press Send a message. You can send to the whole community, some units, or just the board. See the board section, step 42.
To send one, ask the assistant: Prepare a message to the community. Type it or speak it, check what the assistant writes, change anything, and press Send to every owner, then Yes, send it now. It goes out from The property manager (or The board, if you choose). See the board section, step 41.
For maintenance staff
Your list of work, in one place. Press Staff sign-in at the top of the association's site.
1. See your work
After you sign in, you land on Maintenance. Press Assigned to me to see your requests in a table. Each row shows how long it has been waiting; urgent ones come first. Press a row to see the photos and notes under it.
Press Start work when you begin and Mark done when you finish, with a short note.
2. Add your photo
Open My profile and add a photo and, if you have one, a work email. Residents see them on the Board and staff page so they know who's coming to their door.
3. Find a shutoff in the Red Book
Open the tools menu, then Red Book (emergency). Type what's happening, such as water leak or power outage, and the Red Book shows where the shutoff is, how to use it, who has the key and who to call. Press Call to phone a number. In a life-threatening emergency, call 911.
You can add shutoffs, contacts and photos too. Photos keep full quality, so take them close enough to read the labels.
For the Association Lobby team
The owner console is for Association Lobby's own team. Press Admin on associationlobby.com and sign in.
1. Customers
Customers lists every association with how many features are on, board and staff, open maintenance, AI credits and how far along its setup checklist is. Press a row to turn features on, start a 14-day demo, open the website, manage it or open its setup checklist.
Who can use each feature: in an association's row, press Who can use each feature. Pick a feature at the top, such as Budget or Paint designer. You see everyone listed for that association: board seats, managers and site admins, and owners (owners aren't listed for board-only features like Budget). Uncheck a person to stop them using it, or check them to let them back in, then press Save who can use it. A check only works if the person's role already allows the feature and the feature is on for the association. You and company staff always keep access. New associations start with everyone allowed.
2. People, AI and prices, payments
People finds a person and assigns a board role. AI and prices sets which AI is used and what it costs. Payments and look up creates payment links. Image generation is for Association Lobby's owners and associations where it's switched on.
When you add a person, choose the kind of access. Owner has full access to everything. Company admin sets up every association, without owner tools. Partner, for salespeople and partner companies, can add new associations and set up only the ones they add. A partner has no owner tools and can't see other associations, money pages or bill pay.
A partner who adds an association becomes its association admin while it's set up. Under Owners, company admins and partners, each partner lists the associations they added. Press End setup access once the board takes over. Removing a partner ends their setup access everywhere. To change an owner or company admin to a partner, remove that access first, then add them as a partner.
3. Florida rules
The Florida rules tab holds the deadlines from Florida law. When the state changes a law or an attorney asks for a change, open the rule, change it, press Preview what this moves, then give the reason and press Save and move deadlines.
Open deadlines at every association move to match, and each board gets a notice in the bell. Completed deadlines never change. Mark a rule Reviewed by an attorney once the attorney has checked it. Each change is kept in the rule's history.
4. Dashboard and the menu
After you sign in, the Dashboard shows what needs the team: associations still working through setup, demos ending this week, Florida rules waiting for the attorney and management companies.
On a computer, the menu on the left has a box to find any association by typing part of its name. On a phone, the buttons along the bottom open Dashboard, Associations, Customers and the menu. Every page on associationlobby.com has the same header, signed in or not. On a phone, press Menu at the top for the main links, Your access and Sign out.
Customers starts with a table of every association. Press Setup, Demo ends, Last activity or Open maintenance to sort it.
5. Add an association
Press Add an association. Step 1 creates it. Step 2 downloads the getting-ready packet to send to the board yourself; nothing is emailed for you. Step 3 opens its setup checklist.
Within about a minute of creating it, its home page gets a first About the building from the address you entered: a short introduction, the address under At a glance, a welcome line, and up to six nearby places, such as the beach, a shopping and dining area, a park, a marina, a grocery store or the hospital, each with about how far it is. Places come from public maps (OpenStreetMap and Wikipedia); the association's AI only chooses which ones to list and never makes up a place or a distance, and this first lookup isn't charged to the association. The board or property manager should check it, add amenities, buying and renting, and change anything that's wrong in About the building. If the address is missing or can't be found, only the introduction is written.
Under Options, Messages from the board is ticked to start. It's free. That turns it on, with the Message board. Untick it to keep it off. It can be changed later on the association's Setup checklist or What's included page, by you or its property manager.
6. Management companies
Companies lists each management company. Create a company with its owner's email, then link the associations it manages. An association has one company at a time. End a link and the company's people lose access right away; the association keeps its documents and history.
7. Bill pay with Life Passion Works (in progress)
The board selects Bill pay in All settings, Bill pay service. That shows Being set up. When LPW confirms, open that association's Bill pay service page and press Start Bill pay for this association; that turns bill pay on and starts the monthly billing cycle. If the board turns it off, it ends by itself at the end of that cycle (checked every hour). Only the Association Lobby team can start it, one association at a time. Turning it on connects that association to its own LPW account; turning it off stops new invoices and approvals, while payments the board already approved still go out on their dates.
Testing uses LPW's test keys only, which never move money. The LPW keys live only in Supabase Edge Function secrets, never on the website. Each association is linked to exactly one LPW account, and the system refuses any update that doesn't match it.
Turning on bill pay for an association: 1) the manager, the board, or one of us (the owner, Lisa or John) emails partners@lifepassionwork.com with a New partner request (see Management companies, step 6); 2) LPW creates the association's account and confirms; 3) check the association, its approvers and approval rule match the request; 4) turn bill pay on for that association; 5) tell the manager it's live. Never turn it on before LPW confirms.
The LPW connection settings live only in Supabase Edge Function secrets. If LPW issues new partner credentials, the old ones stop working at once, so replace all of them right away. The LPW address setting must point to LPW, not to our own webhook address, which LPW enters on its side.
For management companies
A management company account lets one office manage several associations. Each company sees only its own associations.
1. Sign in
Association Lobby adds your company and its owner. Go to associationlobby.com, press Sign in, then Board sign in, type your work email and press Email me a link. Your company's associations are ready when you arrive.
2. Your company page
Press Your company in the menu. Company owners and admins see every association the company manages. Each manager sees only the associations assigned to them.
3. Add your managers
Owners and admins: under People, type the person's name and work email, choose Manager, and press Add this person. Then tick the associations they manage and press Save. Nothing is emailed, so tell them to sign in with Email me a link.
To take someone off the company, press Remove from the company. They lose access right away.
4. Coming soon: each association's money stays separate
This isn't available yet. Each association will have its own Stripe account and its own bank connection through Plaid, in the association's name. Florida law says association money is kept in the association's name and never mixed with another association's or the company's.
Company owners and admins will set up payments with each board's treasurer. Managers will record checks and confirm spending only for the associations assigned to them. If a board changes management companies, the Stripe account and its history stay with the association.
5. Coming soon: bill pay across your associations
This isn't available yet. Your managers will see vendor bills for the associations assigned to them, grouped by association, with what needs approval and what's overdue. Access is checked against your company's assignments in Association Lobby first, so a manager never sees an association that isn't theirs.
6. Ask LPW to set up bill pay for a new association
Each association needs its own LPW account before bill pay can be turned on. LPW doesn't create one automatically. Once the board agrees, email partners@lifepassionwork.com with the subject New partner request: followed by the association's name. This is the only address for new partner requests, whether it comes from the property manager or from the Association Lobby team (the owner, Lisa or John).
Include: the association's legal name and address; its Association Lobby web address, for example atrium.associationlobby.com; the number of units; your company's name; the board contact, usually the president or treasurer, with their email; the board members who will approve bills and how many approvals a bill needs (for example two over $2,500); about how many invoices a month; and the date you'd like to start.
Don't include bank account numbers, passwords or keys in the email. LPW collects vendor and bank details through its own secure steps.
LPW replies when the account is ready. Association Lobby then turns bill pay on for that association; turning it on is never automatic, and no emails go out to the board or vendors until you're ready. Send one request per association, including when a board moves to your company from another one.
Common questions from owners and residents
Short answers to what people ask most. You can also ask the assistant in your own words.
I forgot my password. How do I sign in?
Unit owners and residents don't need a password. Press Unit owner sign-in at the top of your association's website and type your unit number and the email the association has on file.
Board members, property managers and maintenance staff press Staff sign-in, then Forgot password, or never set one?, or Email me a link. Open the link on the same phone or computer where you asked for it.
It says my unit number and email don't match. What do I do?
The unit number and email have to match the association's resident list. Ask your board or property manager to check your unit and email on the list.
How do I make the words bigger or easier to read?
Press Accessibility at the top of any page. You can make the text larger, add more contrast or turn off motion.
How do I report a leak or something broken?
On a phone, press Report a problem at the bottom of the screen; on a computer, it's in the menu. Press Take a photo if you like, type what's wrong or press Speak instead of typing, choose where it is and press Send to maintenance. You can follow it on the same page.
You can also tell the assistant, for example "Report a leak under my kitchen sink". It fills in the request for you to check, and you press Send to maintenance. To add a photo, use Report a problem.
Check Already reported in shared areas on Report a problem first, so the same thing isn't reported twice. You can also ask the assistant "Has anyone reported the elevator?".
In a life-threatening emergency, call 911.
Who fixed my problem, and when?
Open Report a problem or My household and find your request. A done request says Marked done by, with the person's name and role, and the date and time, then What was done. You can also ask the assistant "Who marked my leak done?".
How do I see the lobby designs and vote on them?
Open the menu, then More, then Design, and press Design reviews. Pick an area, such as Lobbies or the pool. Or ask the assistant "Let me see the lobby designs" and it opens them for you.
Press Like or Dislike on each picture and write a short note. Each owner has one vote on each picture; pressing again changes your vote. Tenants can look but voting is for owners.
How do I find the rules, such as the pool or pet rules?
Open Documents and type a word, such as pets, in Search documents. It looks inside each document and shows the page where the word appears. You can also ask the assistant, for example "What are the pool rules?".
How do I send a message to the board or the property manager?
Open Messages and press New private message, then choose the board, the property manager or another household. A message to the property manager is read only by the property manager. A message to another household is read only by that household, and Association Lobby staff don't read private messages. Your email address is never shown.
A first message to another household is a request: they choose Accept or Decline before you can keep writing.
I get too many emails. How do I change that?
For messages, press Email settings on the Messages page and choose an email for each message, one summary each morning, only new conversations, or never. Under a conversation, Mute emails for this conversation stops one conversation.
For the newsletter, open My profile and go to Newsletter emails. For pest control and reservation reminders, open My profile, untick Remind me before my pest control visits and reservations, and press Save my choices.
How do I reserve the clubhouse or another space?
Open Reservations (under More, then Ask or report, on a computer). Press Pick a day, pick the start time and how long, read the rules, tick that you agree and press Send my request. You get an email when the board or property manager approves or declines it. To cancel, press Cancel this reservation.
How do I sign up for pest control or change my time?
Open Pest control (under More on a computer) and press a day on the calendar. Pick a time, answer whether the technician may come in if nobody is home, and press Sign up my unit. To change or cancel, press the day again. Sign-ups close the day before the visit.
How do I sell something or answer someone who wants my item?
Open Marketplace, press Sell something and choose a category. When a neighbor presses I'm interested, you get an email; press Reply to answer them privately in Messages. Then press Mark as sale pending, Mark as sold or Cancel the listing.
How do I put the website on my phone like an app?
iPhone: in Safari, press the Share button, then Add to Home Screen, then Add. Android: in Chrome, press Add to home screen when the site offers it, or open the menu with three dots and press Install app.
How do I ask for records such as invoices, contracts or minutes?
Unit owners open Documents and choose Request official records, or find it under More. Say what you need and how you'd like to get it, check the box and press Send my request. Under Florida law the association has 10 working days to respond; the page shows the due date. Tenants should ask the unit owner.
How do I vote, change my vote or check that it counted?
Open Voting. Make your choice, check the box and press Send my vote; you get a receipt code by email. If the vote says it can be changed, open it again before it closes and press Change my vote. Enter the receipt code on the vote's page to check that your ballot is counted. Only owners vote, once per unit.
How do I get approval to change my unit, such as new windows or flooring?
Open Ask for approval (under More, then Ask or report, on a computer) and press Start a new request. Fill in the four parts, press Choose files to attach the contractor's certificate of insurance and any drawings or photos, sign by typing your full name and press Send to the board. Allow two weeks, and don't start until it's approved.
How do I add or change my photo?
Open My page, or press your unit at the top of the page, then press Add my photo. Drag and resize it to fit the circle, press Use this photo, then Save. To fix one you have, press Move or resize photo.
Who can add or remove people from my household?
Only owners can change the household: the unit number and who is listed. A renter listed under a unit can sign in and use the site, but can't add or remove people.
Can I pay my maintenance fees online?
Yes, once the board sets it up. Open My payments in the menu and press Pay now to pay by card or bank account. It also shows what you paid and when. Paying by check still works.
What does the red number on the bell mean?
Something is new for you, such as new design pictures, an answer to your approval request, a project the board told you about or unread messages. Press the bell to see the list and press a line to open it.
How do I take the tour again?
Press the concierge with the yellow flag at the bottom left of any page, or press your name or unit at the top and then Show me around.
The tour points at each part of the page with a short note. Press Next to go on, Back to go back, and End tour or the Esc key to stop. It only shows you around; it doesn't change anything.
On phones the concierge sits just above Report a problem. The tour doesn't run while the board is previewing the site as an owner.
How long do I stay signed in?
Owners and residents stay signed in on their own device for 7 days after their last visit, and for 30 days at most. After that, sign in again with your unit number and email.
Board members, property managers and staff can see money and settings, so they're signed out after 8 hours without activity, and 7 days after they signed in at most. A note at the top of the page says why.
Approving or rejecting a bill needs a sign-in from the last hour. If yours is older, press Email me a sign-in link, open the email on the same device, and decide again.
On a shared or public computer, always press your name and then Sign out when you're done.
Common questions from the board and staff
Short answers for the board, property managers and maintenance staff. The assistant answers these too, and can open a page or fill in a ticket for you.
Where did the menu go when I opened an association?
On associationlobby.com, the side menu stays on every page, including the user guide, the setup checklist and Your password. Association names at the top of the menu open in a new window, so the menu stays open in the first one. Close the association's window, or switch back to the first one, to return.
How do we get bill pay turned on for our association?
Bill pay with Life Passion Works (LPW) is still being tested. When it's ready, the property manager (or the president or treasurer, if there's no manager) emails partners@lifepassionwork.com with the subject New partner request: and the association's name. Management companies, step 6, lists what to include.
LPW sets up the association's own account and replies. Association Lobby then turns bill pay on, and the board chooses who approves bills. Nothing is turned on, and no emails go out, until then.
How do I enter the insurance down payment and the monthly installments?
Open Board tools, then Money, then Budget. On This year's budget, press Change under the insurance line. Under When it's paid, choose Payment plan and enter the Total for the year, the Down payment and its month, the Number of installments and the First installment month. Check the twelve months shown and press Save this line. Board step 31 has more.
How do I enter our monthly payments or spending?
Spending isn't typed in one at a time. Open Budget, then How we're tracking. Under Bring in what was spent, press Upload the income statement and choose the profit and loss from QuickBooks or the management company (Excel, CSV or PDF). Anything with no budget line shows under Not in the budget for you to sort. Board step 33 has more.
What do I do with expenses under Not in the budget?
Put each one in a budget line: press Use it for the suggestion, or Choose a budget line and press Save. Or press Add it to the budget, choose a category or A new category..., and press Add to the budget. Next month, that account sorts itself. Choose Leave it out for transfers, refunds and anything that isn't a budget expense.
As a board member, how do I get to the board desk?
You land on My page when you sign in. At the top, press Board view. To go back to your home, press My page in the same bar.
How do I load the budget again or fix a wrong budget upload?
On This year's budget, open Replace with a new file in the Settings box and press Upload a new budget file. All the lines are replaced, so changes made by hand, such as a payment plan, need to be made again. To fix one line instead, press Change under its name. A wrong payments file can be taken out with Remove under Payment files.
Where do I enter reserve balances, or reserves marked NON SIRS?
On This year's budget, press Change under the reserve's name. Under Reserve tracking, choose SIRS or Non-SIRS and enter the Balance, Balance as of, Replacement cost and Year of replacement, then press Save this line. Enter 0 as the amount for the year if no contribution is budgeted. The Reserves table lists every reserve.
How do I start next year's budget?
Open the Next year's budget tab and press the Start button with next year's number, such as Start the 2027 budget. Change any suggested line, then press Print or save as PDF for the board packet.
How do I open a maintenance ticket for the building and assign it?
Ask the assistant in your own words, for example "Open a ticket for the broken lobby light and assign it to maintenance". It fills in a ticket for you to check: the problem, the details, where, the unit (empty for a common area), Urgent, Assign to and Mark it as being worked on. Change anything, then press Create the ticket. Nothing is created until you press it, and maintenance and the board get the usual email.
Residents report problems for their own unit on Report a problem, or by asking the assistant.
How do I assign a ticket, start work or close it?
Open Board tools, then Maintenance queue, and press a row to open it. Assign it, press Start work when someone is on it, add a note, and press Mark done when it's fixed. The resident sees each step.
How do I add Director or Vice President offices and assign them?
Open Board tools, then Board and staff roles, and scroll to Other offices. Pick how many directors and press Add Director offices, or type an office name such as Vice President or VP and press Add office. Then check the person who holds each office in the list at the top and press Save board offices.
Anyone on the board can do this, and so can the property manager. An owner or Association Lobby names the president. Whoever holds an office gets the board's tools at their next sign-in, and Recent changes shows who changed what.
How do I add maintenance staff so I can assign tickets to them?
Open Board tools, then Board and staff roles, and add maintenance staff by email. They don't have to be on the resident list. They then show in the Assign to list.
How do I add or remove a resident?
Open Board tools, then Resident list. Add a person with their unit, email and name, or upload the blank template. Pause keeps a person's votes but stops new ones; Remove deletes the person and their votes. A renter goes under the owner's unit, marked Tenant.
How do I upload a document only the board can see?
Open Documents and press Add documents. Choose Board and managers only, then the folder, then the files, and press Upload. Residents can't see that area. Moving a file into a Board and managers folder hides it from residents right away.
How do I answer an owner's records request?
Open Board tools, then Records requests. Open the request, choose Release, check the documents to share and press Release and close. Use Release part or Don't release with a reason when records are withheld. Watch the due date; it turns amber at 3 days and red when overdue.
How do I approve or decline a reservation?
Open Board tools, then Reservation requests. Press Approve, or Decline and write why. The household gets an email either way.
How do I approve an owner's request to change their unit?
Open Board tools, then Approval requests, and open the request. Press Mark as being reviewed, then choose Approve with any conditions or Not approved with the reason, and press Save the decision and email the owner.
How do I tell owners about work in the building?
Open Board tools, then Project calendar, and press Add a project. To tell the community, tick Tell the community about this project when I save, choose Owners or Owners and tenants, and tick Also send it by email if you want. You're asked to confirm before anything is sent.
How do I invite owners who haven't signed in yet?
Open Board tools, then Community activity. Tick Yes, send the invitation now and press Send invitation. Nothing is sent automatically, one round can go out every 7 days, and each owner gets at most 2 invitations.
How do I add new design pictures or make one with AI?
Open an area in Design review and choose Add photos, or open a picture and press Upload a new version of this picture. Where image generation is turned on, open Board tools, then Design studio, choose an area and photo, pick a style and press Create a new version of this photo. New designs stay private drafts until you publish them.
How do I put design photos into an owner vote?
Open Voting and press Start a new vote. Under Choices, press Add photos from Design review, tick the photos and choose Each photo becomes a choice. Set the dates, save the draft and press Open the vote when it's ready.
Where is the water shutoff or who do we call in an emergency?
Open Board tools, then Red Book (emergency), and type what's happening, such as water leak. It shows the shutoff, how to use it, who has the key and who to call; press Call to phone. In a life-threatening emergency, call 911.
How do I add a deadline, such as the elevator certificate, to the calendar?
Open Board tools, then Yearly calendar, and press Add an item. Choose the due date, how often it repeats and when to send reminders. For deadlines from Florida law, open Florida deadlines and enter the building facts.
How do I get a daily summary email?
Open Board tools, then Reminders and morning brief. Under Your emails, tick Send me the morning brief. It comes at about 7 AM on days with something to report.
Need help?
We are happy to help
Email office@associationlobby.com with your association's name and your unit number. Never send passwords by email.
If a sign-in link doesn't work, open it on the same device where you asked for it.